
Starting a blog on Blogger in 2026 is still one of the most practical ways to build a writing habit, share ideas, write new posts, and earn from ads without paying for hosting. This guide walks you through how to build a blog on Blogger, from account setup to SEO tuning, design, scaling, and monetization.
Why Blogger remains a top choice for blogging in 2026
Blogger has been around for more than two decades, yet it keeps attracting new creators because it’s free, fast, and stable. You sign in with a Google account, enter a blog name, hit the button to create a new blog, and your site is live on the internet within minutes.
Advantages of using Blogger:
- Google integration: you only need one sign-in. Google handles all hosting and storage in the cloud.
- Dashboard and text editor: the platform provides a native dashboard and a text editor for users. You can also switch to HTML view to edit raw HTML.
- Low-effort setup: no installs, no plugins, zero-code blog posts.
- Free subdomain: by default, your blog runs on a free “.blogspot.com” address. Google provides this subdomain and handles the domain name service.
- Hosting and security: because Google owns the platform, your blog is hosted on Google’s reliable servers with built-in SSL (encrypted link) and automatic backups by default.
- Publishing process: you can immediately post an articleto your site with a unique URL. You control the post’s title, content, and URL structure. No extra installs needed.
- Responsive design: works smoothly on smartphone, tablet, Mac, and PC screens.
- Ad-friendly: you can add AdSense or Adsterra monetization tools without plugins. Many publishers start with blogspot earning right after launching their first blog, as the platform allows quick integration of ad codes and fast testing of different monetization strategies.
Disadvantages for publishers
- Limited themes and templates
- Minimal text editor: you can’t customize articles and pages
- Lack of customization options: you’ll need extra effort to add extra formatting
- It lacks advanced SEO features or plugins
- Google owns total control of your blog
- Poor customer support (especially for the latest updates).
Adsterra publishers often build new blogs on Blogger as a “training ground.” You learn to write as a pro, edit, and build a community before investing in a custom platform. But after the blog starts showing great results, they stay and continue developing their business.
What is Blogger and how does it work in 2026?
Blogger is a free blogging platform from Google that makes it easy to create and manage a blog. Behind the scenes, it’s a cloud-hosted site generator. You log in with your account, and Google stores your blog’s content and pages on its servers.
You build your blog by adding new posts, customizing a theme, and adjusting settings—all from an online dashboard. The platform automatically generates the HTML and code needed to display your blog to visitors, so you don’t have to write code yourself. The intuitive interface is organized into sections (like Posts, Theme, Layout, Settings, etc.), which let you control every aspect of your blog.
When you click Create Blog, a pop up window asks for your blog name and address. Blogger checks availability and tells you if the address matches your choice. If it does, click Create again to confirm. Your new blog is live immediately.
Blogger vs. Blogspot: Clearing up the confusion
What do beginners see when searching “blogger create your blog”? They see “Blogspot.” They think these are different services and begin looking for a “blogspot guide,” “how to create blogspot,” or even tutorials shared on YouTube or Facebook.
They’re not the same:
Blogger = the content manager where you write and publish.
Blogspot = the domain host that displays your pages.
Blogger vs. competitors: Which platform wins in 2026?
| Platform | Hosting | Cost | Ease of Use | Monetization |
| Blogger | Google servers | No cost | Very easy | AdSense, Adsterra, direct ads |
| WordPress.com | WordPress | Freemium/Paid | Easy | Ad-friendly though free accounts may be limited |
| WordPress.org | Self-hosted | No cost | Medium | Banner, Popunder ads, affiliate links, |
| Wix | Wix | Freemium | Easy | Third-party ads |
| Medium | Medium.com | Free/Paid | Easy | Partner Program |
| Ghost | Self-hosted | Paid | Advanced | Memberships |
If you look to start a personal blog for free and focus on writing instead of maintenance, Blogger remains a smart choice that makes many publishers happy.
Step-by-step: Signing up and creating your blog
Let’s make your blog right now! We’ll iterate, observing each stage in detail.
Step 1. Sign up via Google account
Sign in with your Google username and account password (the same as your Gmail password) at http://www.blogger.com/home. If you don’t have an account, you can create one in seconds and then come back to blog creation. Finally, click the CREATE NEW BLOG button.
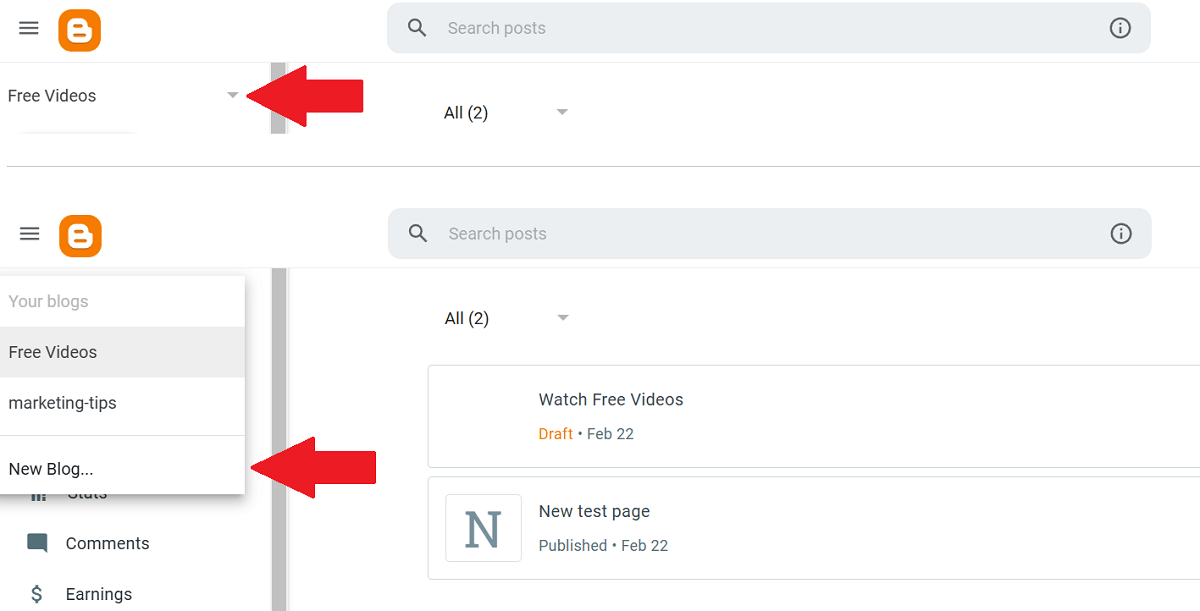
Step 2. Create a blog
- The dashboard opens; this is your new account where you create posts, integrate gadgets, shift themes and designs.
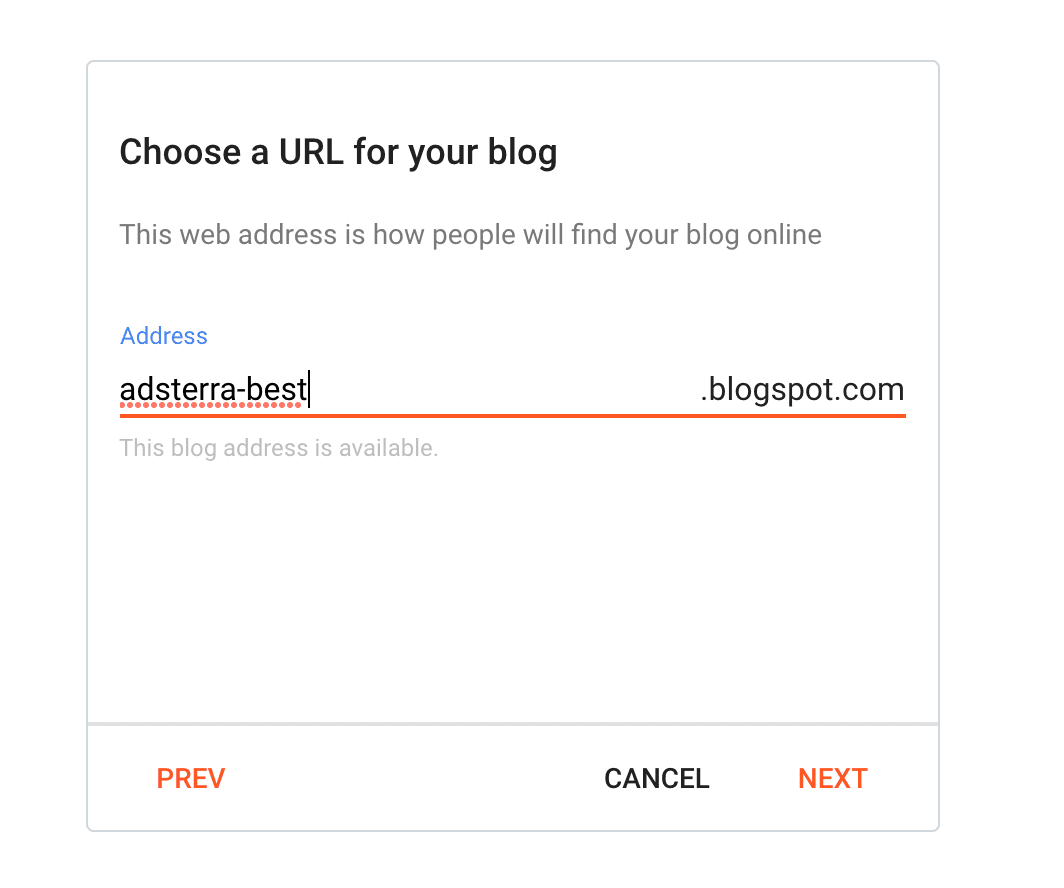
- Click New Blog in the top left corner. Enter the blog’s name (the display name) and its URL. Click Save. Afterward, you’ll be able to share your posts by copying their URLs from the address bar.
A few words about blog security: to change the account password, you’ll need to update the password of your Google account: https://myaccount.google.com/security.
Step 3. Enter the blog’s name and visit the blog
Enter a unique display name that will appear next to all your posts. You can use a keyword in the display name to help your blog rank higher. For example, the screenshot above includes [Monetize your website]. Click Finish, and you’re all set up!

Enter your new blog’s address in your browser’s address bar, and you’ll see what your website looks like. You may not like the appearance at first, but we’ll show you how to change its design to make it look good and professional.
Selecting and customizing your theme
You can customize the look of your blog. Click Theme on the left menu to open the gallery. Many free templates are available, and each comes with a preview. Here’s a more detailed flow:
- In the sidebar, select Theme. The page will show preview thumbnails of available layouts.
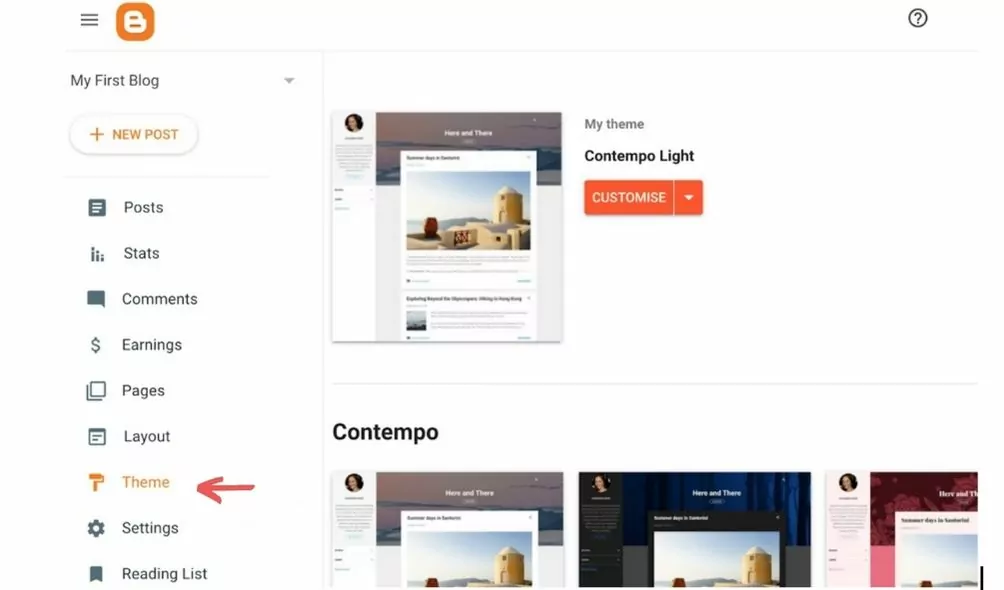
- Choose and preview: Scroll through the theme gallery and click Preview (or Live Demo) to see a preview of a theme. Use the back button to return if you want to look at others. Click the Customise button to modify colors, fonts, etc.
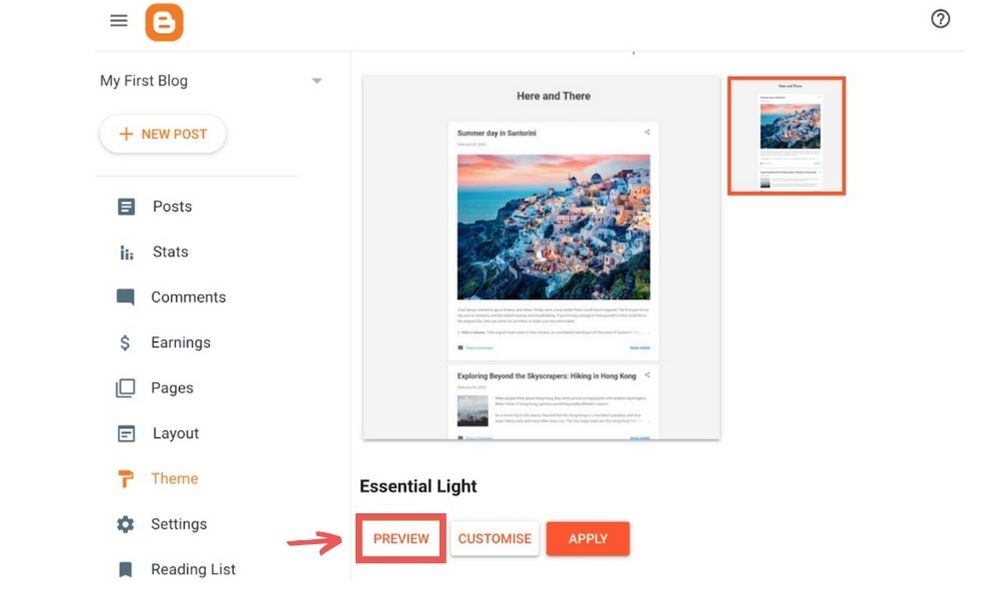
- Apply a theme: When you see a design you like, click Apply. This action instantly changes your blog’s design.
- Customize your theme: After applying, click Customise under the theme thumbnail to adjust colors, fonts, and background. You can also use Advanced options to add custom CSS.
- Use premium themes (optional): If you want to create without limits, get premium templates from third-party sites and upload them (via Theme > Restore). Premium templates may have advanced features for a fee.
Pro tip: check how the applied template runs on all device types: a responsive theme is a must-have for ensuring mobile-friendliness and fast loading times.
Configuring core blog settings for SEO success
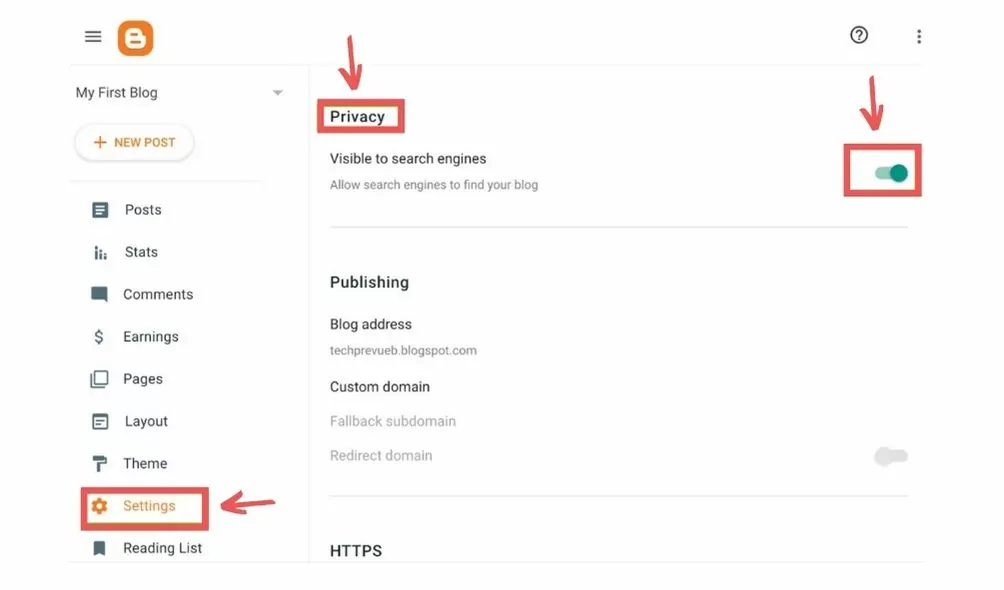
Search engine optimization is essential for making your website visible to both people and robots. And first, you must open your website to search engines. Go to Settings > Privacy and make sure “Allow search engines to find your blog” (or similar option) is enabled. This ensures Google and other search engines can index your posts.
Next, set up a meta description by going to Settings > Basic and clicking Edit next to Description. Enter a concise description (a couple of sentences) that summarizes your blog’s value and purpose; this appears in search results.
Aim to describe how helpful your content is or what problems you solve. That’s how Dr. Cash described their blog: ‘Get access to fresh case-studies and tutorials by affiliate marketing pros from Dr.cash CPA network’
- Search preferences: Under Settings > Privacy, enable custom robots tags if needed. Leave default (index/follow) settings for most blogs. You can also add custom redirects if you change URLs.
- HTTPS: In Settings > Basic, ensure HTTPS is enabled. Google favors secure sites and provides a free SSL certificate, making your blog safer and SEO-friendly.
- Custom permalinks: When you write a post, use the Permalink option in Post Settings to create a short, keyword-rich URL. A clean URL can improve SEO.
- Robots.txt (generated automatically): You can include a custom robots.txt file by choosing Settings -> Enable custom robots.txt. Use any free tool to generate this file, for instance, this generator by SEranking.
- Labels: Use Labels (categories/tags) for your posts under Post Settings. Labels help organize content and give readers (and search engines) context about your topics.
- Custom domain (optional): If you have a custom domain (like ‘yourblog.com’), set it up under Settings > Publishing > Custom domains. Type in the name, hit Next, and follow the instructions to connect to your domain registrar.
Pro tip: remember to check the official Help Center; it’s a valuable resource for learning all the basics of editing, managing your blog along with troubleshooting main issues.
Writing your first post: From draft to publish
Congrats! Your blog is created, and you can write your first blog post. The text editor is very simple. And now, you’ll upgrade skills in creating a new post, adding content with the text editor, and then making it live!
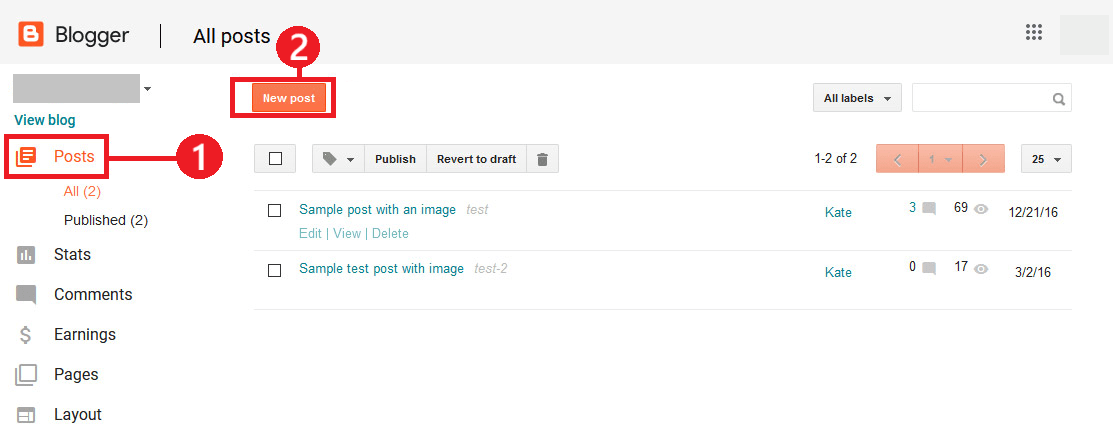
- Click New Post: From the main dashboard, click the New Post button. This opens the post editor, where you create your blog post.
- Post title: At the top of the editor, enter your post title. This is the title of your article and will appear as the main heading on your blog.
- Content formatting: Use the built-in text editor to write your post content. The text editor toolbar lets you format text, insert headings, lists, and quotes. Switch to HTML view to insert custom HTML or special formatting if needed.
- Images and links: Click the Image button in the text editor to upload pictures, or use the Link button to put hyperlinks. These tools make your posts more engaging to readers.
Pro tip: Some ad formats are so user-friendly that you can insert them right in the text mode. Smartlinks are URLs that contain multiple advertisements. You just take this monetization URL from Adsterra and attach it to any piece of text.
- Drafts: While composing, click the Save button in the editor to save a draft without publishing. This lets you come back and continue editing later if needed.
- Labels: On the right side under Post Settings, insert one or more Labels (tags) that describe your idea (for example, “travel” or “recipe”). Labels will organize your assets and improve discoverability.
- Preview and publishing: Click the Preview button at the top to see how your post will look before going live. If everything looks good, click the Publish button (often at the top right) to make the post live on your blog.
After publishing, your new post will appear on your blog’s homepage. You can always go back and edit any published article or page. The editor’s toolbar includes many useful tools: you can schedule publications, use template posts, embed videos, enable comments, and much more.
Optimizing for SEO: Making your blog discoverable
Teach, share insights, provide value: you know the rules of helpful content. But that’s not enough. To attract readers, you first need to optimize for search and generative engines. Fortunately, your platform is relatively SEO-friendly out of the box. But you’ll have to stick to basic principles to balance SEO and future ad monetization like our partner, Patel, whose optimization efforts returned a $20,000 revenue.
Keyword research and prompt watching
Pick topics people are searching for. Use tools like Google Keyword Planner or free tools (e.g., Answer the Public) to find relevant keywords in your niche. Tools like Semrush and SurferSEO help approach to topic selection strategically:
Examples:
- Organic keyword research by Semrush helps check if there is any search volume for the key phrase you pick, and how competitive your pick is.
- Topical map by SurferSEO allows moving from main (pillar) content pieces to more discreet and unique ones.
The above are about classic SEO. AI visibility tools now expose how often your posts are mentioned in AI assistants and generative engines (GEO) like AI Overviews, ChatGPT, or Perplexity. You can easily check what audience is really interested in when asking AI assistants.
AI Prompts differ from traditional search queries as they use natural language. That’s why you should aim for long-tail phrases. They’re more native and aren’t too competitive. Jitendra Vaswani, a digital marketing expert, shares his prompts for long-tail phrase ideation in the full guide to ChatGPT in affiliate marketing.
Aim for natural keyword usage: paste your copy to the Keyword Density Checker and ensure the text is not stuffed. Experts like Noel Ceta say Google can penalize for overoptimization of 0,5% and more.
Titles and meta description
Ensure every post has a clear title and a unique meta description that includes your main keyword and semantically related words. Meta descriptions must be concise and engaging; keep them under 160 characters. Search engines often use your title tag (the page’s title) and meta description in results, and LLMs (large language models) use them to check the content’s overall relevance.
Example: if your key phrase is “best SEO tools,” it should appear in the title, its nearest synonym in the description, along with some closely related terms like “free,” “keyword,” “AI,” or else.
Headings and structure
Organize posts with headings (H2, H3). Google, Bing, and AI search engines pay attention to headings. Include one unique H1, use H2 for main sections, and H3 for subpoints. Use bullet or numbered lists where applicable (like steps, lists of tips), which Google likes as “featured snippet” format. Include tables and comparisons, as AI Overviews often refer to such sources and can cite your content.
Image SEO
Images are essential for storytelling, and they make your posts visually appealing. Add them to support your ideas, avoiding meaningless illustrations. AI assistants are now learning to index images, so you can enrich the content with infographics, checklists, and cheat sheets.
Every image should have a descriptive file name and alt text. Don’t stuff alt tags with keywords, but provide a clear description of images and their purpose. This text (e.g., alt=”upload-section-for-adding-landing-page-previews”) helps search engines understand it’s an image included to a product blog post. Write it naturally; it’s also what displays if the image fails to load. A good alt text strengthens the page’s content for both classic SEO and GEO.
Labels (Tag Pages) descriptions
When you use Labels, Blogger automatically creates pages like blog.com/search/label/LabelName. These are often indexed by Google as category pages. Fill label pages with a brief description in the Layout if possible, or simply rely on having well-labeled posts, to make those pages useful.
Sitemaps and Search Console
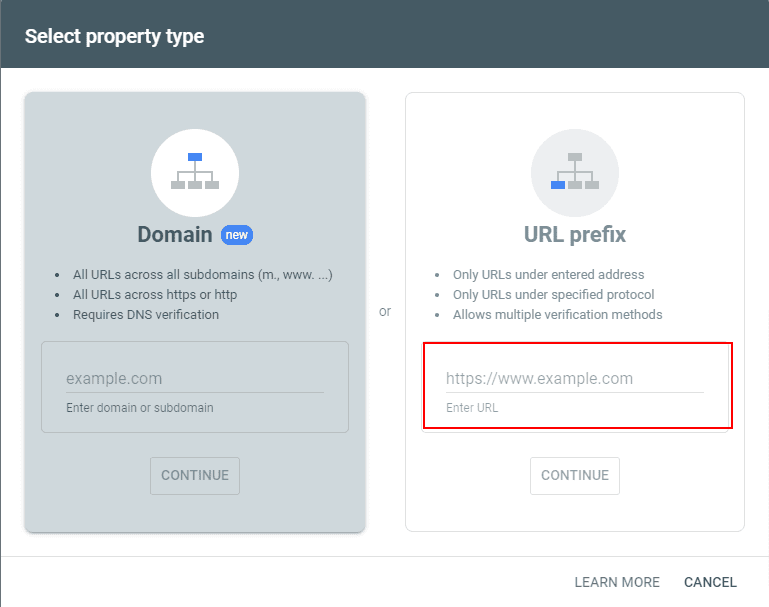
Blogger auto-generates an XML sitemap at YOURBLOG.blogspot.com/sitemap.xml. Submit this sitemap to Google Search Console: Sitemaps -> Add new sitemap in GSC. That’s how Google and AI assistants will know your site structure. But first, add the blog to Search Console and Google Analytics (via Settings > Search preferences or via Google’s tools) for monitoring. When adding your website to GSC, ensure you pick the ‘URL prefix’ property type.
Mobile-friendliness
Use a responsive theme. Google’s mobile-first indexing means your blog should work well on phones. Keep images optimized (smaller file sizes) for faster load times. When you’re ready to drive income from your website, prefer mobile-friendly ad codes like In-Page Push. They appear as sticky banners in the lower part of the screen. While neat and small, they still engage users instead of disapointing them with bad UX.
Quality content
What is quality content? Ultimately, it’s when you write helpful, original, in-depth, and well-researched posts addressing readers’ real pains and problems. Google values depth and usefulness. AI Overviews cite those who can answer specific questions and deliver solutions.
You can take from others but add your unique perspective. Over time, publish consistently. A well-optimized blog can rank quickly – in fact, Google often indexes new Blogger content within 24 hours after launch.
Advanced design customizations
It’s time to go beyond basic designs and polish your blog’s design and features. These things are non-obligatory but can help your brand stand out.
Gadgets
Gadgets are helpful widgets you can include to make posts readable and more engaging. What’s more, you will refer to gadgets when placing third-party codes, like those by Adsterra or AdSense.
Go to Layout -> click Add a gadget in the area you want it to appear -> choose a gadget -> click Save. Common gadgets include Pages, Blog Archive, Popular Posts, Search Box, and Labels. Simply select a gadget and configure it. You can drag and drop gadgets to reorder them. Hover over a gadget in Layout to see the Edit or Remove icons. Platforms like SocialbeKIT and Elfsight share multiple customizable gadgets for free, in case you’re disappointed with the default set.
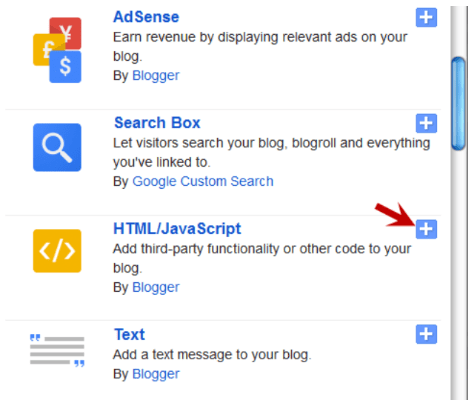
HTML/JavaScript Gadget
If you want to add custom HTML, banner ads, or affiliate banners, use the HTML/JavaScript gadget. This lets you paste code (e.g., Google AdSense snippet or a contact form). For gadgets with custom code, select the HTML code / Javascript gadget, enter a title, paste the code, and click Save.
Custom favicon
Look for the Favicon gadget (usually in the header section of the Layout page). Click Edit Favicon and upload a small image (under 100KB; the less the better) to use as your favicon (the tiny icon in browser tabs). This helps your blog look more professional.
Edit HTML/CSS
You can directly modify the template code, and that’s a truly advanced tweak. Caution: Always click Download Theme first to back it up. So, how do you edit HTML/CSS? Go to Theme > Edit HTML. In the HTML editor, you might paste analytics tracking codes, change header/footer text, or add custom CSS. Or, jump to Theme > Customize > Advanced > Add CSS and insert your own CSS rules (for example, to change fonts or colors). Indeed, this requires some coding knowledge.
Mobile template
Before you click the Publish button, check the mobile preview. Go to the Theme Settings, click the drop down menu arrow, and select Mobile Settings. If you’re an Android user, download the Blogger app to have access to the critical website settings every time you need them. The mobile preview option is here, as well.
Backup and preview
Before making big changes (especially in HTML), always preview and/or backup. Click Settings, look under the Manage blog section. Click Back up content and then download the asset.
Advanced customization allows you to brand your blog and add unique features. For example, you might add a subscription form via a third-party email service (copying their embed code into an HTML gadget), or insert an ad unit by pasting the code in the theme HTML or a gadget.
Monetization roadmap: From zero to revenue
Monetization options for blogs include affiliate marketing, sponsored posts, ad codes by Adsterra, Google AdSense, or any other traffic monetization platform for publishers. If your goal is to earn money from your blog, here’s a roadmap from setup to revenue:
Start with ads
Once you have some content and traffic, resort to high-paying CPM and CPA networks like Adsterra or choose an evergreen option, Google AdSense. AdSense sets strict rules for content quality and compliance; however, it’s integrated with your blog, and you can give it a try!
Alternatively, use Adsterra or other networks that have easier approval rules. For example, an Adsterra case study notes that Blogger stays super-friendly to movie websites. To place ads, go to Layout > Add Gadget > AdSense / or HTML/JavaScript and paste your ad code. Make Banners or Push codes appear on every page via the theme settings or insert them into individual posts.
Affiliate marketing
Sign up for affiliate programs related to your niche (Amazon Associates, CJ Affiliate, ShareASale, etc.). Include affiliate links to products you recommend. Write honest reviews or “best-of” lists to encourage clicks and purchases. Remember to tell your readers you are inserting affiliate promotions: transparency builds trust. Over time, as your audience trusts you, affiliates can become a steady income source.
Sponsored content
As your blog gains authority, brands might want to pay you to write sponsored posts or reviews. Focus first on growing an audience before charging for sponsorships. The advantage of Blogger is that you already own your content (Google doesn’t claim it), so you can make direct deals with advertisers and organizations.
Digital products & donations
Consider selling your own products (e-books, webinars, masterclasses, courses, design templates). It’s called ‘content curation’ and can boost your passive income, generating stable payouts. Use a shopping gadget or embedded code of an external store/donation platform. Even a simple “Buy me a coffee” call to action can yield donations from fans.
Grow, diversify, invest
Focus on growing web traffic through quality content. Even when AI takes over 60% of clicks, your income still depends on traffic. However, you can diversify strategies: aim to zero-click positions by including tables, lists, and comparisons to your content. AI Overviews and AI Mode can cite you, and your blog becomes more recognizable.
Combine ad revenue, affiliate promotions, and content products, making your blog stand out as a source of ongoing earnings. If you earn enough, consider reinvesting in your blog (buying a premium theme, paying for tools or SEO services, etc.). Upgrades can help long-term growth.
Scaling your blog: Long-term growth tips
Get ready for a marathon: set monthly or yearly goals (traffic, revenue, AI citing progress). Celebrate milestones (like first 1000 visitors or first $100 earned). Continually refine your process based on what works.
Analytics-driven approach
Use your stats to find which topics and posts perform best. Create more content on those topics. Use Google Search Console (if you set it up) to see what search queries bring impressions but have low CTRs: update their meta titles and descriptions to engage users to click. From GSC, find pages with stable traffic but low search positions: add queries Google highlights and try to get more quality backlinks.
Building a brand in several channels
Think beyond “just a blog.” Consider developing a logo, consistent color scheme, or even branching into YouTube, Spotify, or Apple podcasts. The bloggers who scaled successfully often diversified: turning blog posts into videos, newsletters, or products.
Pro tip: Use Google’s NotebookLM to convert posts into audio files and then seed them on podcast platforms to gain more backlinks and refresh the audience.
Community and network
Engage with other bloggers. Collaborations (cross-promotions, interviews) can introduce your blog to new audiences. Attend online or local blogging conferences to learn and network. Encourage community feedback: reply to comments, thank readers, and ask optional questions at the end of each post. When people see you’re listening, they stay and become part of your community.
Staying informed
The blogging world changes. Read up on new SEO and GEO trends, platform changes, or affiliate marketing tactics. Many bloggers now use AI tools: one Adsterra case study even laid out a detailed guide to using ChatGPT to draft content and brainstorm. AI can speed up content creation or marketing – experiment with it, but always add your personal touch.
Promoting your blog: Traffic strategies that work
Social media promotion
Each time you publish a new post, share it on Facebook, X, and LinkedIn. Add a short caption that answers a question or highlights a fact rather than just dropping the link. Join a blogging or writing community and engage by giving feedback before posting your own links.
Email lists, collaborations
Add a “Subscribe” gadget so readers can enter their email address. You’ll find it under “Follow by Email.”
Every week, send a short update with new posts or special resources
Collaborate with authors within your niche or related ones. Write guest articles with a link back to your site. This brings high-intent and relevant traffic and can improve SEO via backlinks.
Online communities
Participate in forums and groups related to your niche, for example, on Reddit (e.g., r/Blogging, r/webmonetization, or niche-specific subreddits). Also, join Facebook groups, share helpful answers, and link to your relevant posts (without spamming).
Sites like Quora are also good for answering questions and linking to your blog (sparingly). If you’re tech-savvy, join Discord’s servers for content creators and webmasters and share your expertise.
Paid ads (optional)
If you have some budget, launching small paid ad campaigns (Google Ads, Facebook Ads) can jumpstart visits and conversions. This requires proficiency; start only if you have polished your content, gained enough traffic, and have a clear conversion goal. Which goal? For instance, you want users to click Smartlinks, so you need more traffic to come to your page. You then either grow organic views or buy cheap clicks/views to make money from paid Facebook traffic or visitors from Google.
Final thoughts
Blogger may not be too competitive when compared to the newest platforms like Ghost or Substack, but it offers an unbeatable combo of cost-free operation and ease of use. It lets you focus on writing, with minimal maintenance, while serving options for making passive income. But before gaining in passive mode, be active in choosing the best ad format. Jump on board and generate the code today!
How to start a blog on Blogger FAQ
How to start a blog using Blogger?
Go to blogger.com, sign in using your Google account, and click Create Blog. Choose your blog name, pick a theme, and start writing a new post. Next, you can add monetization platforms and website analytics.
Is Blogger still worth using in 2026?
Yes, many content creators still use it as it’s free, user-friendly, and well-integrated with Google. About 0.4% of all websites are built on Blogspot in 2026 (per W3Techs data). It may lack some modern features, but for beginners or small businesses, the low entry barrier is attractive. Just be aware that for a very complex site, platforms like WordPress are more flexible.
Do I need to pay for Blogger?
It’s free of charge: Google provides hosting, themes, and even SSL at no cost. You only pay if you buy a custom domain (like .com) to replace the default blogspot address (which is optional). Otherwise, there’s zero fee to start or run a Blogger blog.
Can I switch my Blogger blog to WordPress later?
Yes. Blogger allows you to export your content (posts and comments) as an XML file. You can then import it into WordPress (using the WordPress importer). But remember that designs and some features won’t carry over automatically.
Is Blogger good for beginners?
Definitely, it’s one of the easiest free platforms for creators and writers. No hosting, installation, or coding skills required, and you can publish your first article in minutes.
How do you get 1000 views a day on Blogger?
In the AI-search era, this won’t be a one-month deal. But if you post high-quality content, promote on social media, and use trending keywords, your chances are still solid. Remember that you don’t chase traffic: you look for audiences. Find what people really want to learn within your niche by visiting Quora and subreddits. Provide answers to the exact questions they ask. Look at the AI Overviews feed and aim to answer all questions listed below your search query. And don’t forget to submit your URL to Google Search Console to track performance and gain content insights.
What are the pros and cons of using Blogger?
Pros: free, easy, integrated with Google, ad-friendly. Cons: limited design flexibility, fewer themes, and fewer plugins. You can check the WordPress vs Blogger comparison in our guide.
Can I use a custom domain with Blogger?
Absolutely. Go to Settings > Basic. Look for the Custom domain option. Enter your domain, ensuring it starts with www. Click Save. Now, add the two CNAME records provided by Blogger to your domain provider (registrar). Find the DNS section and paste two CNAME records. Using a custom domain looks more professional and can be better for branding, but it’s optional. Even without it, the ‘yourblog.blogspot.com’ will work fine.
How do I improve traffic to my Blogger blog?
Use these strategies: share posts on social media, engage in niche communities (e.g., subreddits or forums), and optimize for AI search along with SEO. Consistent quality content is key. Also consider email marketing to keep readers engaged. Successful bloggers often target long-tail and less competitive user queries rather than focusing on high-volume ones.
What are the best monetization strategies for a Blogger blog in 2026?
Start with Adsterra or AdSense display ads for quick revenue. Layer in affiliate links, digital products, and sponsored content as traffic grows. Adsterra’s flexible formats (Push, In-Page Push, Native) work especially well on Blogspot without strict approval hurdles.