
For many publishers, blog images are a headache. There are many questions involved, like where to get quality images that look good and are okay to use in your blog. How do these images make your blog better? Where to place them? How many images to use in a post? What is the ideal image size?
Let’s face it. You’re not a photographer. You just want people to enjoy your content, buy something, sign up or click on ads. So, why do you need to worry about photos in your blog posts? This article explains why and how to use images in your blog posts.
You believe that words are enough to entice your readers, engage visitors, and persuade them that your web design is fantastic.
The truth is that words alone are insufficient, especially when writing a web-based blog post.
The average reader is lazy; they want information as soon as possible. They don’t want to focus and read your content. They want to understand it quickly and easily to determine whether it will be helpful to them.
Just because images are crucial doesn’t mean your words aren’t as well. That is why you do not have a blog post that is entirely made up of images.
Images are a valuable tool for transforming your content from boring to exciting. So it’s odd that some publishers aren’t aware of the best practices for including images in blog posts.
If you’re one of them, keep reading.
10 blog image tips you must know
1. Make the text more readable
We use images to separate points and make the text easier to skim through, just as we use paragraphs to separate points and make it easier for the reader to digest.
This is especially true for long articles. Remember that the average reader doesn’t want to read much.
When they see a wall of text, the first thing they’ll do is look for a different source. Even if your wall of text isn’t quite as long as others, they won’t bother if it appears too difficult to read.
2. Use clear and crisp images
Compare and contrast these two images.
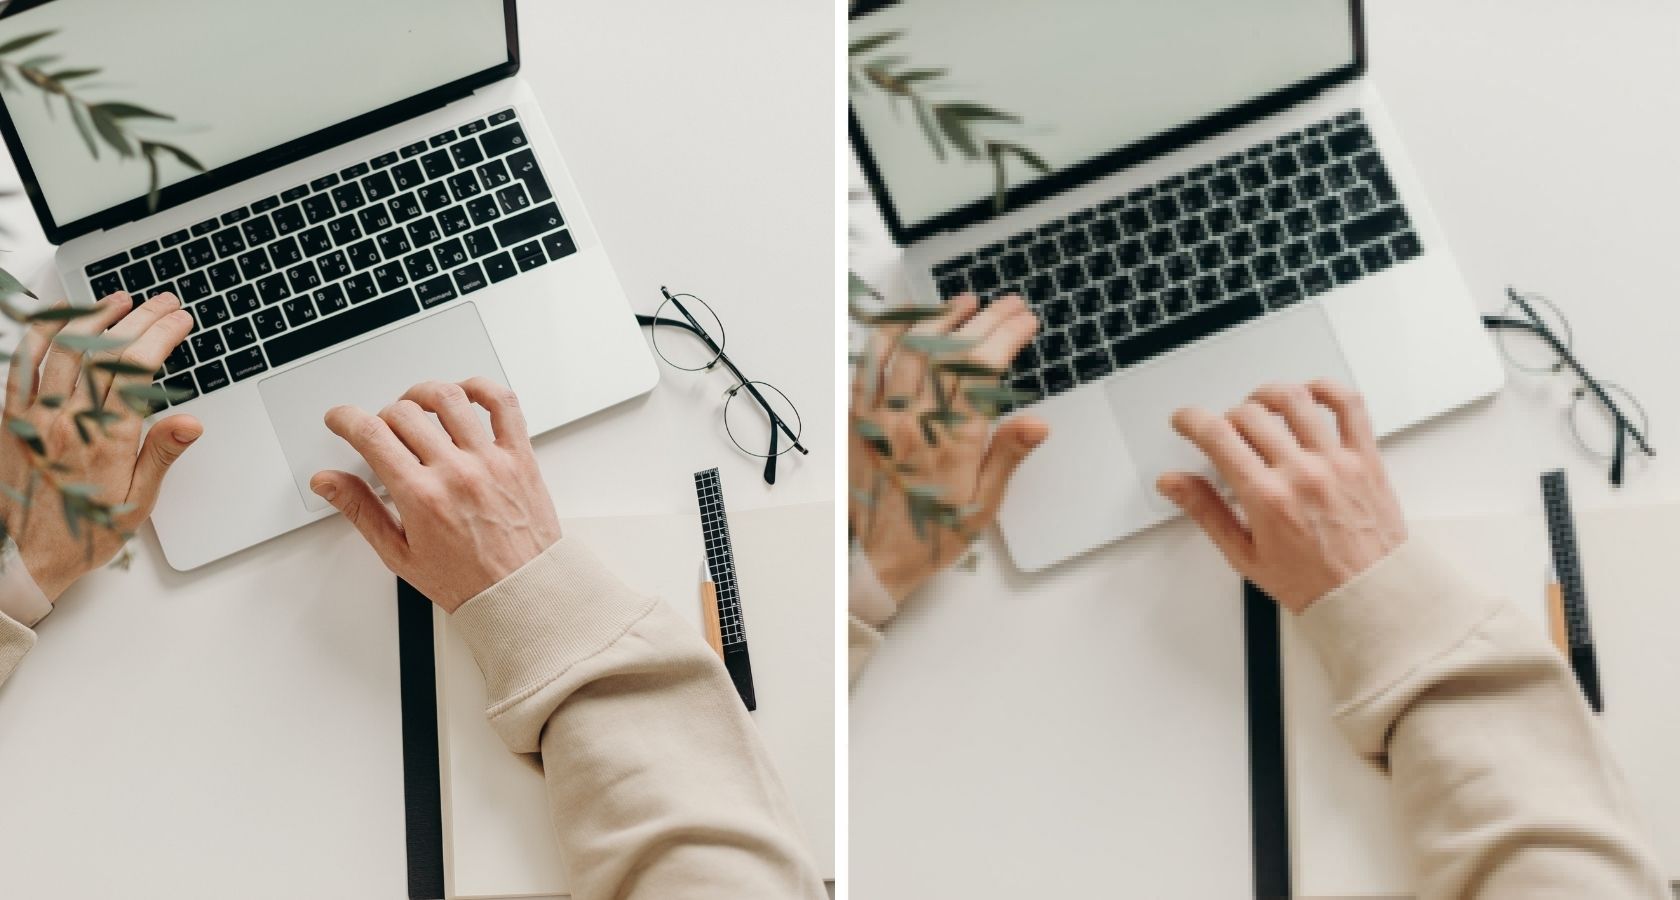
On the left-hand side, the image is clear. The image on the right is blurry and of poor quality.
Anyone who clicks on a blog post where all the images were like the ones on the right will leave the page right away.
If you can’t be bothered to find high-quality images, you’ll be creating low-quality content.
So, while images are very important, you must also use high-quality ones. Using low-quality images is just as bad as using no images at all.
3. Use free or legal images
You shouldn’t just copy and paste an image from the internet into your blog post. Some businesses charge a fee for using their images.
When using images from the internet, make sure you’re legally allowed to use them on your website. In most cases, you must credit the creator or source of the free image.
It’s also logical. You wouldn’t want another publisher to use your content without giving you credit.
Legal images can be defined with several terms:
- Royalty-free images aren’t exactly free, as the name implies. You can use these images wherever, but you can’t edit or resell them.
- Rights Managed: With these images, you typically purchase a single-user license for the image in question. Before you use it, you must first decide how you intend to use it. If you use one of these images in a blog post, you can’t use the same image in a video. You’d have to buy an additional license.
- Public Domain: There are no restrictions on images in the public domain. Before using these images, you do not need to obtain permission. Although it is generally accepted that you provide attribution, it is not mandatory.
- Creative Commons: The image creator has permitted anyone to use it under the Creative Commons license. However, you will be required to give credit to the creator.
Check out Unsplash or Pixabay if you’re looking for high-quality free images that you can use without crediting the source.
4. Use screenshots to describe actions
Blog images serve as a visual aid for the message you’re trying to communicate.
It’s sometimes beneficial to include screenshots in your work to strengthen this image. You can use numerous screenshot tools and browser extensions to capture entire web pages or just sections.
If you use a Mac, here’s a helpful tip:
- Press shift + command + 4 at the same time. The screenshot icon appears.
- Press the spacebar to select the entire screen.
- Left-click to take the screenshot.
5. Put alt-tags in images
Blog images are an underrated weapon for killing it at on-page SEO. So, always use the alt tag to your advantage. Never leave it empty.
If you’re using WordPress, you can edit the image by clicking on it.
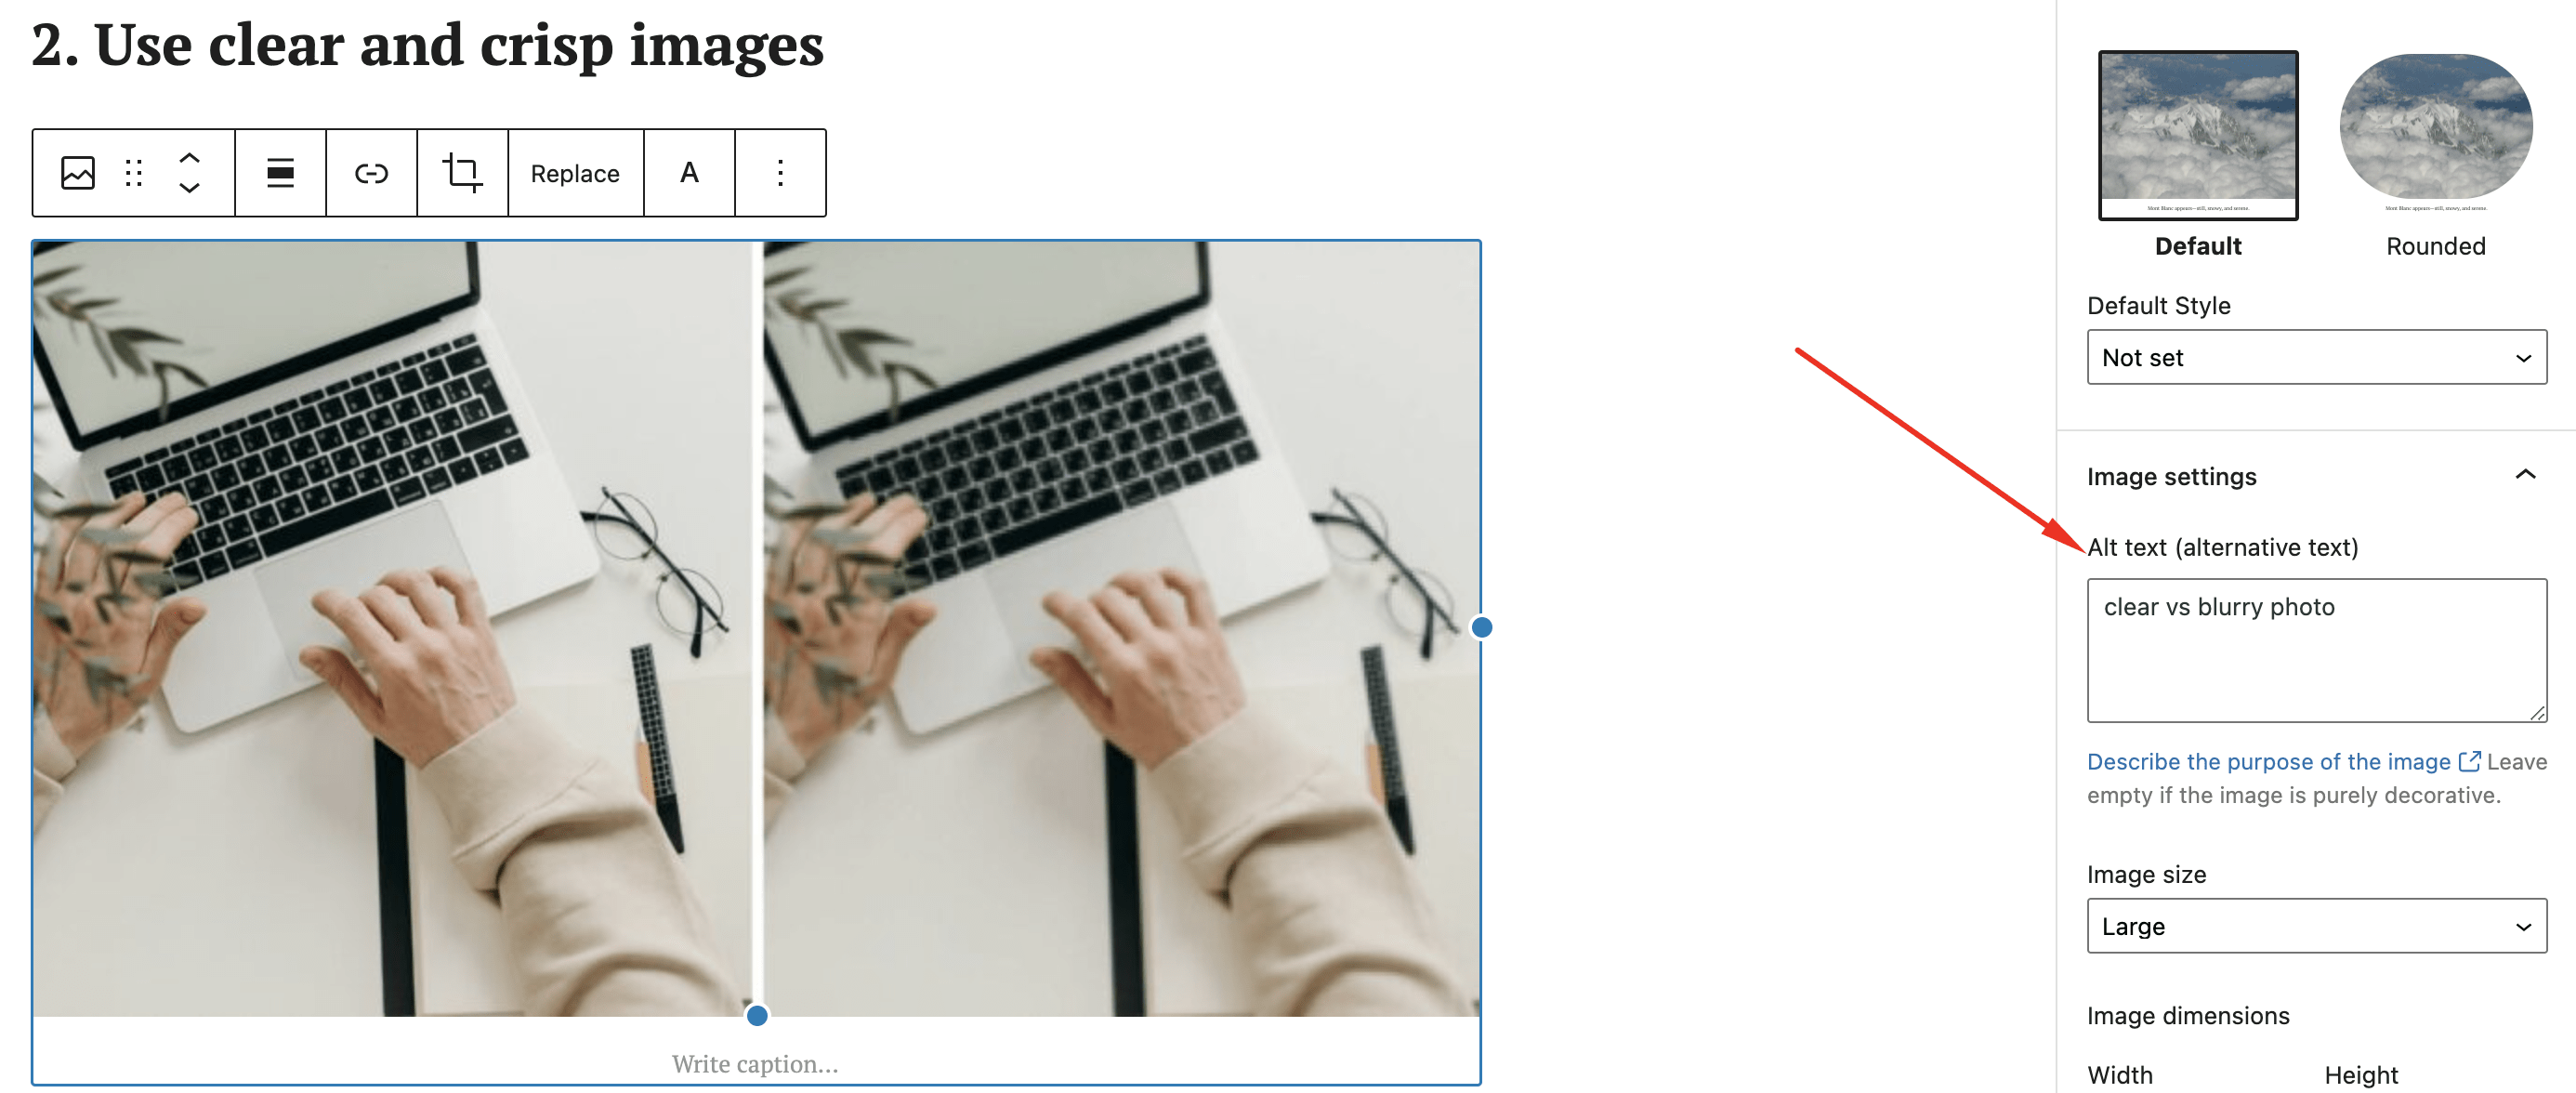
Go to image settings and enter the alt text.
If your blog images aren’t displayed for some reason, the browser will display the alt image instead.
Another advantage of using alt text is that Google uses it to rank the image tab on its SERP.
If you have an image about converting DOC to PDF and use the alt-tag text “converting DOC to PDF,” your image may appear in a Google image search for “how to convert DOC to PDF.”
Users may then click on the image and visit your website’s content.
Instead of image2939xj, choose a practical alt image text. We also recommend saving or renaming your images to match the alt tag.
6. Optimize large blog images
Clear images are fantastic. However, using clear images on your website take up much space. And a large file size means they’ll take a long time to load on your site.
According to extensive research, 53% of users will abandon a mobile website that takes longer than 3 seconds to load.
Optimize your images in such a way that keeps the visual quality high while keeping the file size small to avoid a slow website.
Although you can do this manually, it’s more efficient to use a combination of tools.
If your blog is hosted on WordPress, install the WP Smush plugin, which will automatically compress your image file sizes to keep them as small as possible. Alternatively, you can use a tool like Optimizilla to optimize your images before uploading them to WordPress.
7. Use blog images frequently
If you’re looking for a specific number, one image per 150 words or 1000 characters is a good starting point.
The number of images you use differs from one post to the next. Every image must contribute to the post in some way. It shouldn’t just be there for the sake of appearances.
Use as many images as you can. Just be careful not to go overboard, or your blog post will resemble an Instagram feed. If you use too few, you’ll end up with the wall of text we’re avoiding.
The key is to stick to the following checklist:
- Does every image have a purpose and adds value to the content?
- Did you use the appropriate image to support each of your points?
If you answered yes to both of these questions, you’re off to a good start.
Important note:
Generally, step-by-step blog posts will require more images and probably less text because you’ll be visually explaining all of the steps involved.
Suppose you were writing a blog post explaining how to install WordPress. In that case, you’d probably need more images than a blog post discussing the advantages of social media marketing.
In the first case, your readers want to make sure they’re pressing the right buttons and typing the correct text by following your instructions to the letter.
Because the main point of the blog post is for the reader to understand the benefits, you’ll need fewer supporting images in the second example.
8. Make your blog images cohesive and on-brand
Keeping your blog image in line with the aesthetics and style of your blog will help improve brand awareness and indicates professionalism. This is particularly useful if your content is shared across social media. Readers will immediately recognize your content while scrolling their feeds. This not only generates user confidence but also reinforces your authority in your niche.
Establishing a templated design for your blog cover pictures via cohesive visual elements (fonts, color palette, graphics, logo, etc.) also lets you stand out from the crowd. And this is vital if you want to succeed in the long run.
9. Use the right image format (JPEG/ PNG/WebP)
The fundamental rule is that the PNG format should be for images with a lot of text, so they’ll be crisper and clearer. In addition, you should upload graphs, charts, and infographics in PNG format to make them more readable.
On the other hand, JPEG is a better option for regular pictures or a natural photograph meant for viewing and not reading. Therefore it won’t be very much a problem if the image has blurred borders.
Why image formats matter to your website & blog
Most people stick to a handful of formats, including JPEG, PNG, WebP, GIF. Image formats affect your website performance. Some image formats take more space than others, which impacts your site’s loading speed.
Appearance. Certain image formats are more detailed and clearer than others.
Scalability. Expanding or shrinking an image changes its quality. The level of distortion depends on your image format as well. This will affect the image’s ability to look great on small and large screens.
You should keep a consistent standard with one or two image formats on your website in most cases. Ideally, the formats you select should balance quality with performance.
JPEG images allow faster website and blog load times but can suffer from scalability issues. They’re perfect for ordinary color pictures that include a photograph, for example, millions of color combinations.
WebP is a new image format that provides superior lossless and lossy image compression. With WebP, website owners, and web developers, generate smaller, richer images.
In comparison to PNG, WebP lossless images are 26% smaller in size. WebP loss images are 25-34% smaller than JPEG images with SSIM quality index equivalent. Read more about WebP here.
10. Use the ideal image aspect ratio
When it comes to blog images, image size isn’t just about how they look but also about how quickly they load. And also how they affect the reader’s experience.
One thing to consider is the aspect ratio – the width-to-height ratio.
Use landscape (wide) images on your blog so that the pictures add meaning but doesn’t push down the rest of the content.
Nobody wants small photos with insufficient detail, but everyone hates waiting a few seconds for an image to load. What is the best way to deal with it? Here are some suggestions:
- Match image width to blog content area: images should be no wider than the width of your blog post field. If you choose a wider width than the field allows, you’ll either lose image details or make the image look terribly out of alignment with your text blocks.
- Keep an eye on the file size. The image’s height and width determine its size. While you must not overlook image resolution, avoid using images larger than your blog’s content area.
In WordPress, any images wider than the body text will be shrunk automatically. When deciding where to put the images, consider centering them or placing them to the right of your post. As we read from left to right, this will make it easier for your readers to enjoy your content.
Where can you get images for your blog posts?
Obtaining images for your blog is a lengthy process. Finding a trustworthy source with the imagery you want is only the first step. Then you must find the right image for each post while also ensuring that the photo is legal to use on your website. After that, you can download the images from the source and import them into your WordPress library to use in your entries. Here are a few ideas:
Stock photo agencies are a great source. For example, Pexels is a reputable online stock photo agency with libraries of millions of high-resolution images to choose from.
Typically, these sites sell their stock photos under a Royalty Free license, which is highly flexible and covers many commercial and editorial purposes, including blogging.
Although some stock images are not free, you can get them for meager prices, ranging from $1 to $15 per download.
Free Image Websites. Suppose you don’t have the budget for photos or want to save money. In that case, you’re probably thinking of getting free images for WordPress. This is a regular beginner’s approach.
Using legal low-cost paid images from verified websites is a much safer approach.
WordPress Plugins
If you’re a WordPress website owner, there’s another way to get your blog photos. Using plugins like pixelrockstar allows you to get great images for your blogs easily.
These WordPress plugins often integrate a library of millions of high-quality stock photos into your WP layout. This lets you search and use photos from the library to your posts quickly.
Most times, their images are covered by a custom digital license, which covers the use of photos in any WordPress site and any other location (social media, for example).
Placing advertising codes to your images
With Smartlink format – a URL that can be added to both text and images, you can monetize your blog pictures. When your users click on this picture, they’ll be redirected to the advertiser’s page. And you know what that means; you earn more revenue. It’s quite an aggressive technique, but it works.
Moreover, not every website-building platform lets you host ad formats through code injection. Or maybe your website design doesn’t allow tampering with the source code.
You can add our Smartlink format to any text or picture. But remember: don’t mislead your users, especially if a particularly sensitive audience. We recommend testing this approach by using one or two pictures per page.
To learn more about its awesome features, see our smart Smartlink guide.
Conclusion
As much as the words in your blog posts, the images you use tell a story. It’s critical to include the right images to help you craft and tell that story.
You’ll be well on your way to creating visually appealing and engaging content if you follow the best practices listed in this blog post. In addition to images, your website’s fonts play a big role in helping readers enjoy your articles and landing pages. Learn more about the importance of fonts here in our website font guide.