
Sure, writing high-quality content after thorough keyword research helps greatly in search engine optimization and provides a great user experience. But what if your optimized page is invisible to search engines due to some technical SEO issues?
We’ve seen publishers complain that their published web pages fail to show up on Google’s search engine results page (SERP). Some think they’re suffering some Google penalties due to a black hat SEO technique they use.
To make matters easier for you, we’ve written a guide to technical SEO and how it helps ensure that Google crawls and indexes your web pages.
This is our complete guide to technical SEO for beginners and new website owners in 2022. You’ll learn all about:
- Crawling and indexing
- XML sitemaps
- Duplicate content
- Structured data
- Hreflang
Let’s begin with simple definitions.
What is technical SEO?
Technical SEO can be defined as a process of ensuring that your website meets the technical requirements of modern search engines to improve its organic rankings. Crawling, indexing, rendering, and website architecture are the most important aspects of technical SEO.
Why is technical SEO important?
Like we mentioned above, you can have the best content and the best website. But if your technical SEO isn’t working, you’ll not rank. Search engines must be able to find, crawl, render, and index the pages on your website at the most basic level.
But that’s just scratching the surface. For your site to be fully technically optimized, your web pages must be secure, mobile-friendly, duplicate-content-free, and fast-loading.
How websites work
Before optimizing your website for search, you need a basic understanding of what you’re optimizing!
We’ve outlined a typical website’s journey from securing a domain name to its fully rendered state in a browser. You might be wondering why this is important. Here are a few reasons:
- Knowing how a website works can help you improve your page load time, which helps keep users on your site (improves dwell time), and helps you rank higher.
- Certain resources, such as JavaScript, are rendered on a “second pass” by Google. Google will first look at the page without JavaScript, then render JavaScript a few days to weeks later, which means SEO-critical elements added to the page using JavaScript may not be indexed.
We’ll teach you how to diagnose your website’s inefficiency, what you can do to improve it, and its benefits on your rankings and user experience.
Purchasing a domain name: The first step to creating a website is purchasing a domain name from registrars like GoDaddy or Namecheap.
Link an IP address to the domain name: The Internet doesn’t recognize names like “adsterra.com” as website addresses (DNS). So it uses a series of numbers known as an Internet protocol (IP) address (ex: 127.0.0.1). To link those human-readable website names to machine-readable numbers, we’ll need to use a DNS.
How a website gets from the server to the browser
Let’s go through the process of visiting our website adsterra.com.
- You request our domain name: You can request our website by typing the domain name (adsterra.com) directly into your browser or clicking on a link to the website.
- Your browser makes requests. When your browser receives your request for a web page, it sends a DNS lookup request to convert our domain name to its IP address. Then it sends a request to the server for the source code used to build our website.
- The server sends the requested resources. When the server receives this request, it sends our website files to your browser to assemble.
- Your browser assembles our web page. Your browser has now received the resources from the server, but it must still put everything together and render our web page for you to see it. The browser creates a Document Object Model (DOM) as it parses and organizes all of the web page’s resources.
- Your browser makes final requests. The browser will only display a web page after all of the pages’ necessary code has been downloaded, parsed, and executed. If the browser requires any additional code to display our web page, it’ll make a separate request to our servers.
Then boom, our website appears in your browser.
Now we’ve explained how our website appears in your browser, let’s look at the components of a website or the code (programming languages) that make up our web pages. JavaScript – (interactive, dynamic, etc.)
Components of a website
HTML: What a website says
HTML, or hypertext markup language, is the foundation of every website. It defines elements such as headings, paragraphs, lists, and content.
Here’s an example of text and the HTML code behind it:
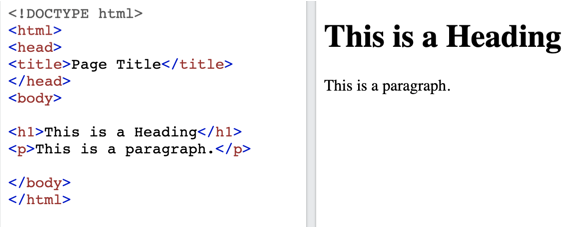
Search engines crawl these HTML elements to determine how relevant your document is to a specific query.
CSS: How a website appears
CSS, or cascading style sheets, determines your web pages’ fonts, colors, and layouts. Because HTML was designed to describe content rather than style it, the introduction of CSS was a game-changer.

JavaScript: how a website works
We used HTML to create web pages in the early days of the Internet. Then CSS was introduced, which allowed us to design and style webpage content however we wanted. But thanks to JavaScript, websites could now have structure, style and also be dynamic.
For non-static web page creation, JavaScript opened up a lot of possibilities. When you access a page enhanced with this programming language, your browser will run JavaScript against the static HTML returned by the server, resulting in a webpage that has some level of interactivity.
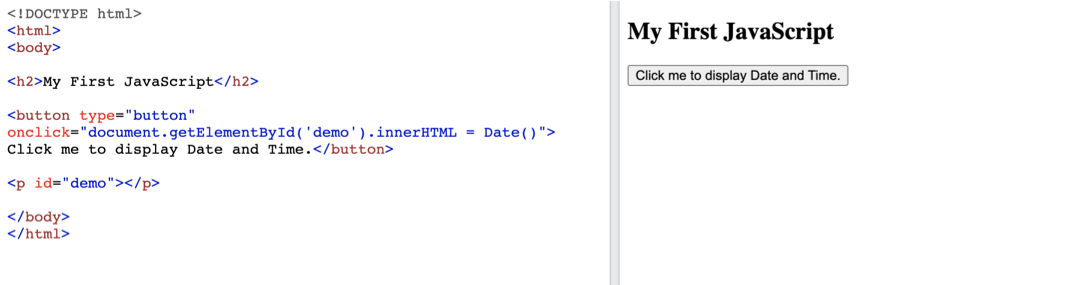
You’ve almost certainly seen JavaScript in action — you didn’t realize it! JavaScript can create a pop-up or request that third-party resources such as ads be displayed on your page. It’s essentially the magic behind monetizing your website with ads.
Server-side rendering vs. client-side rendering
Search engines do not view JavaScript like browsers which can cause some SEO issues. This issue arises from the difference between client-side and server-side rendering. The majority of JavaScript is run in the client’s browser. On the other hand, server-side rendering executes files on the server before sending them to the browser in a fully rendered state.
According to Google, as long as you don’t block Googlebot from crawling your JavaScript files, they should be able to render and understand your web pages in the same way a browser can.
You can see if Google sees things the same way your visitors do. Use Google Search Console’s “URL Inspection” tool to see how Googlebot views your page.

- Copy and paste your webpage’s URL into the search bar and click Test Live URL.
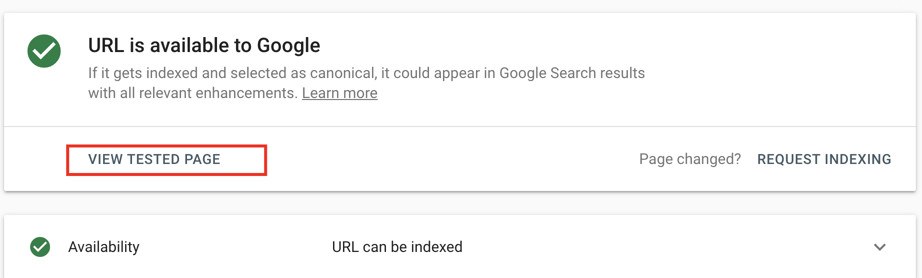
- Click View Tested Page after Googlebot has re-crawled your URL to see how your page is rendered.

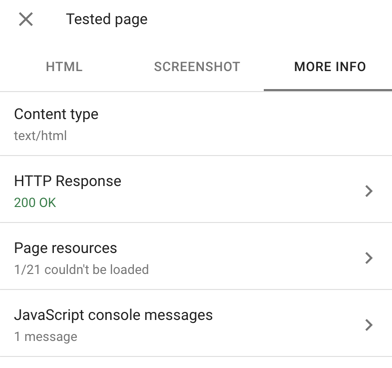
The Screenshot tab shows you how Googlebot renders your page on a smartphone. Google also shows you a list of any resources they could not obtain for the URL you entered in the More Info tab.
Understanding how websites work lays a solid foundation for the next section: technical optimizations to help Google better understand your website’s pages.
Technical SEO Tips
1. Create a well-organized site structure
The structure of your website determines how all of the pages are organized. In general, you want a “flat” structure: your site’s pages should all be only a few links apart.
Search engines can easily crawl a flat structure. For a blog or a local pizza shop website, this isn’t a big deal. But what about a 100k product page eCommerce site?
You want your structure to be well-organized as well. A disorganized structure frequently results in “orphan pages” (pages without internal links pointing to them). It also makes it difficult to identify and correct indexing problems.
To get a bird’s eye view of your site structure, use Ahrefs’ “Site Audit” feature. Visual Site Mapper can also help you see how your pages are connected more visually. It’s a free tool that lets you see your site’s architecture in real-time.
2. Find issues with Indexing
The first step is to identify any pages on your site that are difficult for search engine spiders to crawl.
Coverage report
The Google Search Console’s “Coverage Report” should be your first stop. If Google cannot index or render pages that you want to be indexed, this report will let you know.
Screaming Frog
Screaming Frog is the most famous crawler in the world for a reason: it’s fantastic. We recommend running a full crawl with Screaming Frog after you’ve fixed any issues in the Coverage Report.
3. Use a consistent URL Structure
There’s no need to overthink the structure of your URLs, especially if you run a small website (like a blog). You do want your URLs to have a logical, consistent structure. This actually helps users determine their location on your website.
Organizing your pages into different categories also provides Google with additional information about each page in that category.
4. Put noindex tags on thin or duplicate pages
The majority of websites will have pages with duplicate content. That’s fine. But when those duplicate content pages are indexed, this becomes a problem. The solution here is to add the “noindex” tag. The noindex tag instructs search engines not to index the page.
Use Google Search Console’s Inspect URL feature to double-check that your noindex tag is set up correctly. Enter your URL in the text box and click Test Live URL.
If you see the message “URL is available to Google,” it means that your noindex tag is configured incorrectly.
If you see a message that says “Excluded by “noindex” tag,” the noindex tag is working. It may take a few days or weeks for Google to re-crawl the pages you don’t want to be indexed.
5. Inspect URLs with Google Search Console
Is there a URL on your site that isn’t indexed?
The Google Search Console’s Inspect feature can help you figure out what’s going on. It’ll tell you why a page isn’t being indexed.
However, you can see how Google renders pages that are indexed. That way, you can double-check that Google can crawl and index every single piece of content on that page.
6. Reduce web page size by removing third party scripts
A page’s load time is increased by 34 milliseconds for every third-party script it contains. However, you need some of these scripts (such as Google Analytics). It never hurts to look at your site’s scripts to see if there are any that you can remove.
7. Check your XML sitemap
An XML sitemap is still needed for Google to find your site’s URLs in the age of mobile-first indexing and AMP. According to a Google representative, XML sitemaps are the “second most important source” for locating URLs.
Go to the Search Console’s “Sitemaps” feature to double-check that your sitemap is working properly.
8. Enable breadcrumbs navigation
Navigation via breadcrumbs is well-known for its SEO benefits. This is because breadcrumbs automatically add internal links to your site’s categories and subpages, which helps solidify your site architecture.
Not to mention the fact that in the SERPs, Google has converted URLs into breadcrumb-style navigation.
(screenshot Breadcrumb-style URLs in Google search results)
9. Use hreflang for international websites
Is there a different version of your page for different countries and languages on your website? If that’s the case, the hreflang tag can be extremely useful.
However, hreflang tags are difficult to set up. And Google’s instructions for using it aren’t exactly clear. Use the Hreflang generator tool by Aleyda Solis.
Use the Hreflang generator by Aleyda Solis to generate hreflang tags for multiple countries, languages, and regions.
10. Scan your website for dead links
It won’t make or break your SEO if you have a lot of dead links on your site. Broken links, according to Google, are “not an SEO problem.”
But what if your internal links are broken? Broken internal links can make it more difficult for Googlebot to find and crawl your site’s pages. As a result, we recommend conducting a quarterly SEO audit that includes the correction of broken links.
You can find broken links using almost any SEO audit tool, including SEMrush, Ahrefs, or Screaming Frog.
11. Check your XML sitemaps
It’s challenging to keep track of all the pages in your sitemap if you have a large site. The main purpose of your sitemap is to show search engines all of your live pages, so you want all the URLs in it to point to live pages.
We recommend using the Map Broker XML Sitemap Validator to validate your sitemap. Simply paste a sitemap from your website. Also, check for any broken or redirected links.
12. Noindex tag and category pages
We strongly advise noindexing category and tag pages if WordPress powers your site. (Unless, of course, those pages attract a lot of visitors.)
Most times, these pages do not provide much value to users. They can also result in duplicate content issues. You can easily noindex these pages with a single click if you use Yoast.
13. Improve your website speed
You can speed up your site in several ways:
- Make use of quick hosting.
- Use a quick DNS provider.
- Reduce the number of ‘HTTP requests’ by limiting the use of scripts and plugins.
- Instead of using multiple CSS stylesheets or inline CSS, use a single CSS stylesheet.
- Reduce the size of your web pages (using a GZIP tool ).
- Remove any unnecessary spaces, line breaks, or indentation from your HTML, CSS, and Javascript code (see Google’s Minify Resources page for assistance).
Extra technical SEO tips
Consider yourself a search engine spider sifting through a 1000-word page on a product for bicycles. How do you find the vendor, the price, the product description, or the reviews?
Schema markup comes into play here. It allows you to give search engines more specific classifications for the information on your page by spoon-feeding them.
Structured data and rich snippets
Schema is a method of labeling or organizing content so that search engines can better understand what elements on your web pages mean. According to research into search engine ranking factors, there is no link between Schema and first-page rankings.
But Schema gives your data some structure, which is why it is also known as “structured data.” Structuring your data is known as markup because you’re marking up your content with organized code.
Google’s preferred schema markup (announced in May 2016) is JSON-LD, also supported by Bing. We recommend visiting Schema.org for a complete list of the thousands of available schema markups or seeing Google Developers’ Introduction to Structured Data for more information on using structured data.
You can use Google’s Rich Test Results tool to test your markup after you’ve implemented the structured data that best fits your web pages.
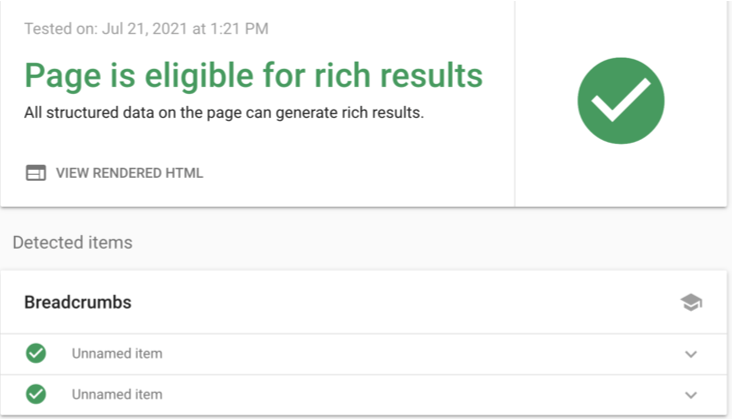
Schema markup can enable special features (Rich snippets) to make your pages stand out in the SERPs while helping search bots understand what their content is about. You’ve probably seen them while checking out your favorite coffee makers or your dream car.
Rich snippets can appear as Carousels of Top Stories, review stars, site link search boxes, and more.
Remember that using structured data can help you get a rich snippet, but it’s not guaranteed. As schema markup grows, Google will add more types of rich snippets in the future.
Tips for marking up your pages:
- Use a variety of schema markup on a single webpage. However, if you mark up one element, such as a product, and the page contains other products, you must also mark up those products.
- Follow Google’s Quality Guidelines and don’t mark up content that isn’t visible to visitors. If you use review structured markup on a page, make sure the reviews are visible on that page.
- Google recommends that you use structured markup on versions of a webpage, not just the canonical version.
- The structured markup on your page should accurately reflect the content.
- Always use the most specific type of schema markup.
Canonicalization
With canonicalization, you can tell search engines which pages you prefer. When Google crawls the same content on multiple web pages, it can be difficult to determine which page to index in search results. Here’s where the rel=”canonical” tag comes into play. It helps search engines index the preferred version of content rather than all of its duplicates.

This attribute tells search engines where to look for the original, master version of a piece of content. Essentially, you’re saying, “Hello, Google index this source page instead of its duplicates.” So, if you want to republish a web page but don’t want to risk creating duplicate content, the canonical tag can help.
There’s a good reason to avoid duplicate content. Google wants to reward websites that offer unique, valuable content rather than plagiarised content. To give users the best experience possible, Google rarely shows multiple versions of the same content. Instead, it prefers to show only the canonicalized version. If no canonical tag exists, it shows the version they believe is most likely to be the original.
Mobile optimization
Given that mobile accounts for well over half of all web traffic today, it’s safe to assume that your website should be mobile-friendly and simple to navigate. Google released an update to its algorithm in April 2015 that prioritized mobile-friendly pages over non-mobile-friendly pages. So, how do you make sure your site is mobile-friendly?
Although there are three main ways to make your website mobile-friendly, Google recommends responsive web design.
Use the Mobile Usability report in Google Search Console. If Google discovers that a page on your site isn’t mobile-friendly, they’ll notify you.
If your site is not optimized, Google will notify you. They’ll even tell you what’s wrong with the page in detail. That’ll help you know what needs to be fixed.
Image optimization
Heavy images are one of the most reasons for slow-loading web pages. In addition to image compression and choosing the suitable image format, there are other technical ways to improve how fast your website displays images to your users.
Let’s review some of the most important ways to improve image delivery:
1. SRCSET:
The srcset attribute enables you to have multiple versions of your image and then specify which version should be used in which circumstances. This code is added to the tag (located in the HTML) to provide unique images for specific devices.
This is a unique way to improve your on-page user experience by providing different and optimal images to different device types, which speeds up your image load time.
2. Lazy loading
When you visit a webpage, instead of seeing a blank white space where an image should appear, you sometimes see a blurry lightweight version of the image or a colored box in its place while the surrounding text loads—the image loads in full resolution after a few seconds.
The low-resolution version is loaded first, followed by the full-resolution version. This also aids in the optimization of your crucial rendering path! So, while the rest of your page’s resources are being downloaded, you’re showing a low-resolution teaser image to help users understand what’s going on. Check out Google’s Lazy Loading Guidance for more information on how to lazy load your images.
Conclusion
Many experts believe that the rapid advancements in AI, particularly machine learning, will one day help Google understand websites perfectly. And in the process, making technical SEO obsolete.
Google’s complexity appears to be doubling every year, but this has only increased the importance of technical SEO. Instead of disappearing, we believe technical SEO will fragment into more areas: mobile technical SEO, crawl optimization, and traditional technical SEO. All of these fields are developing independently and becoming more complex for the average publisher.
