
Have you ever asked yourself how to start a blog and earn enough money to live comfortably? Many people have already done so. When you read another post about “Top 20 monetization techniques” or “How to double your traffic in 2 months” from the first lines of Google search, you see the finished product. A blog is a product and a business. And if you want your blog to rank and sell in the same way as Kinsta or Hubspot, you need to understand how they were created.
Using a SMART goal analysis, let’s assume you’d make $2000 per month. For most people, an extra $2000 per month would make a significant difference in their lives.
Most top bloggers, including whoever is behind Mashable, started from the same point as you are now. The only thing that separates you from them is a decade of experience.
Fortunately, we can help you avoid making the same errors that most bloggers made and still make. So you’ll not only have an easier time achieving your revenue goals, but you’ll also do it faster.
Let’s discuss the procedure in thirteen significant steps:
Step 1: Find an awesome blogging niche.
It’s not really necessary to have a revolutionary idea to start a blog (learn how to create a blog on Blogger). However, your blog should be focused on a specific interesting money-making topic. You have unique experiences, a distinct tone, and a lively personality that will charm your readers. When deciding on a blog niche, there are key questions to consider.
1. Are you interested in the niche?
Sometimes when you read an article, you can tell if the author is passionate about the topic or if they don’t care about it. Whatever niche you choose, you must genuinely enjoy it and be naturally curious about it. Also, you’ll quickly run out of ideas if you don’t. Most importantly, you won’t be able to produce captivating and engaging content consistently. You’ll quickly get tired after two months of writing on a subject you don’t like.
If you’re passionate about a topic, you can spark your readers’ interest, too.
Don’t have a blog yet? Well, you can start making a profit even with one-page website if you have enough traffic. Sign up and apply for Adsterra Smartlink.
2. Is this niche interesting to other people?
You must also discover what other people are interested in. Otherwise, you might end up with a blog that doesn’t attract many readers.
For example, you might think that a blog about how wonderful your dog is fascinating — but is it likely to attract many readers?
But a blog about caring for dogs appeals to a much larger audience of readers.
You can take a personal interest and turn it into a universal one, like one of the Adsterra publishers, who manages to make $100 daily on a cricket blog.
Consider how you first became interested in the subject. How did you come to know so much about the subject? Consider how many questions and misunderstandings you had when you first started out and what helped you gain experience.
Here are a few popular categories that consistently perform well:
- Personal finance
- News
- Entertainment
- Sports
- Online business on the internet
- Investing/Productivity
- Freelancing
Recommendation: To find out how frequently people search for a specific category or niche, use Google’s Keyword Planner tool. It will reveal what people are interested in and what they are not interested in.
Action step: Review the categories we mentioned earlier. Do any of your ideas fit into one of these groups?
You can pick a topic from your list that you’d like to turn into a blog for the time being. Once you’ve done that, narrow it down and make it even more specific.
You might want to start a personal finance website, for example. Niching it down could mean creating a personal finance website for $10,000-a-year millennials or for those who want to retire early.
Step 2: Find a name for your new blog
Now for the fun part: finding a name. Your blog name and logo are how your users and future readers will remember you. Don’t overanalyze; every big brand you know today developed its magic over time. Even if you’re stuck, keep going.
The best way to come up with a blog name is to brainstorm. We addressed finding a blog niche and idea in the previous step. Now it’s time to put those ideas into words. So, get a spreadsheet or a piece of paper. Then write down every word that comes to mind for ten minutes. Combine words and phrases until something stands out. Write down 5–10 potential names. Those names should now be available as domains. A domain is your blog’s online home.
Our domain is adsterra.com. Adsterra is how you find us, and you can’t use the domain because we own it. Which domains are available?
Use Namecheap’s domain checker. Enter each name one by one to see what’s available. After clicking the check availability button, you’ll see if the name you want is taken.
Keep trying names until you find a blog name you like. If none of your suggested names are available as a .com, go back to the drawing board.
Here are some additional domain name suggestions:
- When possible, use.com.
- Never use hyphens or numbers (words that sounds the same but are spelled differently).
- Keep it short and sweet.
- Simple to pronounce and remember.
- Simple words are better.
- When you find a name you like, click add it to your cart.
Avoid words with double meanings and slang. Check the Urban dictionary for your blog’s name before using it.
Step 3: Get your blog online
It’s now time to publish your blog. Don’t worry if it appears complicated at first. It’s a lot easier than it appears. You’ll need web hosting (where your blog lives) and a domain name (your blog’s address) to get started. The good news is that Bluehost offers both as a bundle. It’s also extremely affordable. and the first year of your domain name is free. Check out our guide to getting a free domain name.
Step 4: Install a CMS
Your website needs a content management system (CMS). This allows you to create and manage blog posts. There’s only one great option for this: WordPress. That’s because it’s easily one of the most powerful, easy-to-use, and customizable CMSs out there. Because of how popular WordPress is, most web hosts offer a one-click install for WordPress. It’s super easy.
Of course, you might want to use a dedicated blogging platform like Medium or even LinkedIn. There are a few good reasons to go with a blogging platform. However, we generally recommend owning your own platform. That way you have fuller control over who your audience is and what you get to write.
Install WordPress on your host.
Here are the instructions to install WordPress on BlueHost with just a few clicks:
- Log into your Bluehost account.
- Open My Sites on the side menu.
- Click Create Site.
- Enter your blog’s name and tagline. Click Next.
- Choose the domain you want to install WordPress on.
- Choose the directory you want to install it on. Click Next.
Step 5: Pick an eye-catching WordPress theme
It’s very easy to change your site’s look and feel with WordPress. And the best part is that you don’t need coding. That’s because WordPress uses “themes.” These are little packages of code that can be swapped in and out. Whenever you change your theme, your website’s appearance will also change but your blog content stays the same.
This makes it very easy to evolve your site over time without having to rebuild your entire site from scratch. For now, you’ll need to pick your first WordPress theme. When picking a theme for any of your blogs, choose a mobile responsive WordPress theme.
If you want a wider selection of WordPress themes at standard prices, Themeforest is the most popular WordPress theme marketplace. You’ll find just about anything you want in its selection.
ACTION STEP: Purchase a theme and add it to your website.
After you purchase your theme, log into your WordPress blog, go to the Theme section which is under Appearance in the WordPress sidebar menu. Then follow the instructions for adding the theme.
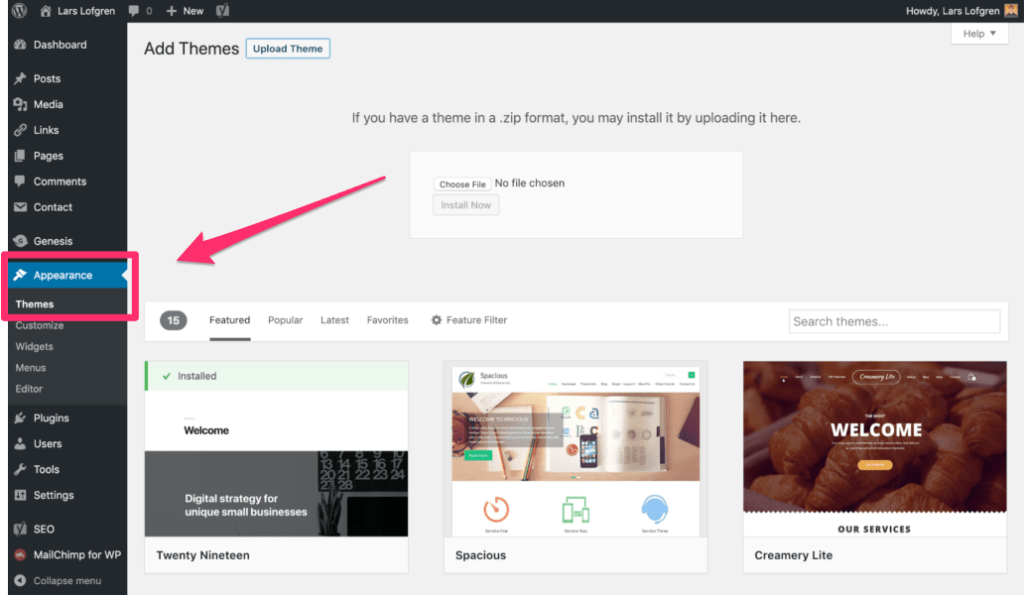
You’ll have to upload the theme files to WordPress and activate the theme from within WordPress. You can find the upload option by going to Themes > Add New, a button towards the top. Then you’ll see this option to upload:
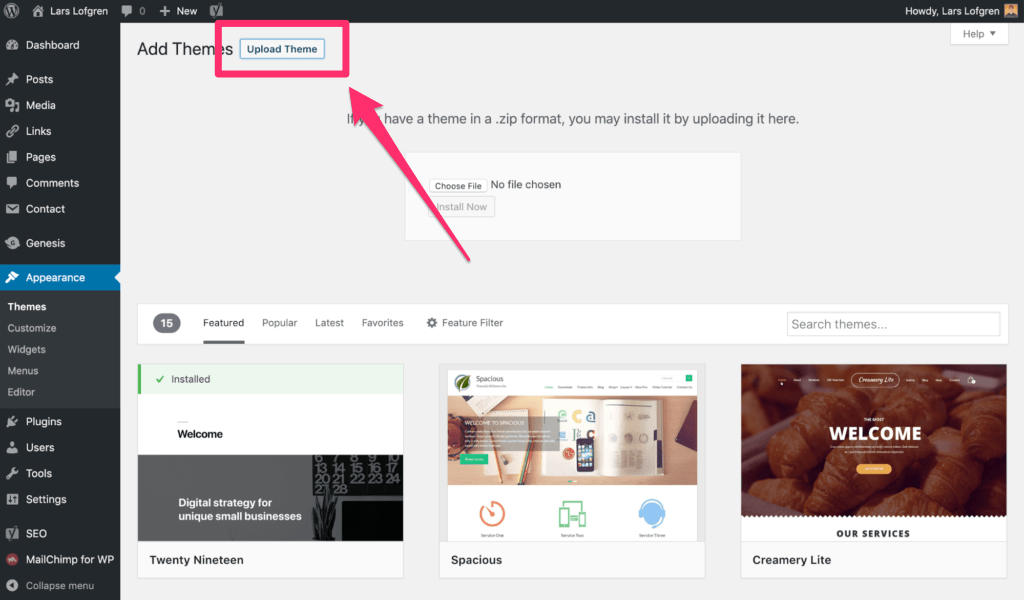
You’ll be able to manage any themes you’ve uploaded to your WordPress blog from your Themes section:

Step 6: Install WordPress plugins
One of the best parts about WordPress is that it’s infinitely customizable. Since it’s open-source, you can change it to do whatever you want. The easiest way to make changes is with plugins. Plugins are little batches of software you can install within WordPress to get extra functionality. This is how you’ll add a bunch of extra features to your site without having to code anything yourself.
BUT be careful here and try not to go overboard.
Some bloggers will install dozens or even hundreds of plugins on their blogs. That can cause a bunch of problems later on. Not only can plugins cause unexpected conflicts with each other, they become a security liability since it’s unlikely that every plugin owner will maintain the plugin over time. They also become a huge headache to manage.
When you have that many plugins, you’re never sure which plugin is causing a particular problem.
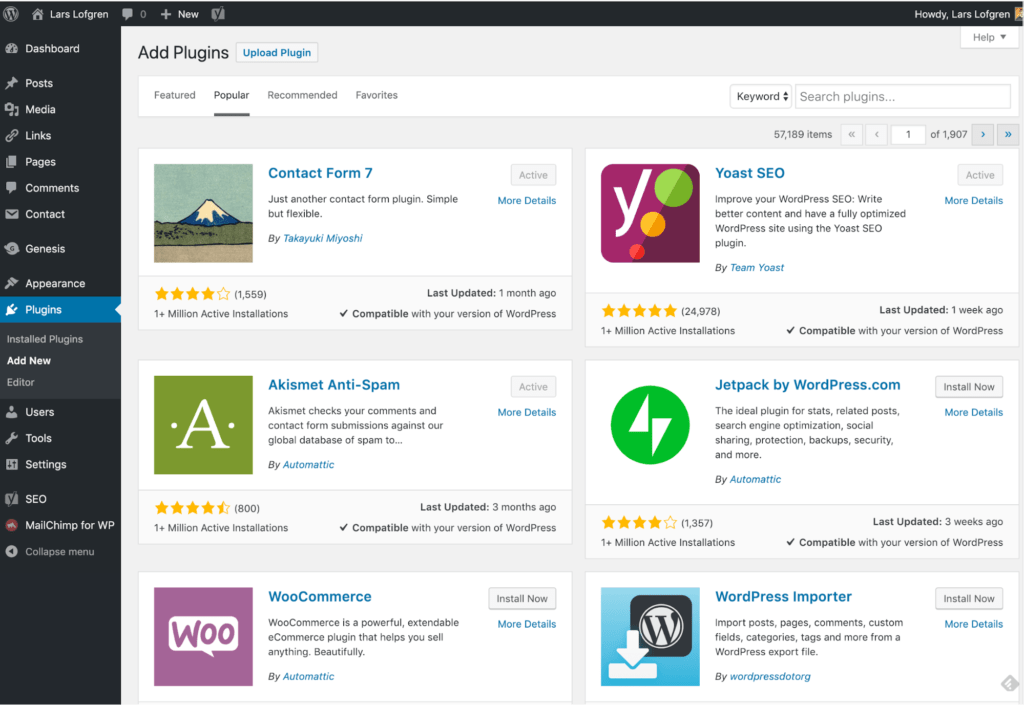
ACTION STEP: Download helpful plugins
Here are a few of them:
- Akismet – Required for every blog, it automatically filters a ton of comment spam which is a problem for every blogger.
- Yoast SEO – The most highly recommended SEO plugin, it handles a bunch of SEO tasks automatically for you and also makes on-page SEO tasks a lot easier. Psst! We use Yaost too.
- Contact Form 7 – The most popular contact form out there. Set up a contact page on your site and then use this plugin to create a contact form that will email you any time someone fills out the form. Super easy.
- TinyMCE Advanced – A bunch of improvements to the WordPress editor that makes writing in WordPress a lot easier. These days, we usually skip this one. We write all our posts in Google Docs and then format them in WordPress using its default HTML editor.
- WP Super Cache – A good plugin to speed up your site.
Learn more about the best WordPless plugins.
Step 7: Install Google Analytics
Google Analytics is a free website analytics tool from Google. It allows you to do things like:
- See how many people are visiting your website
- Find the demographic info of your visitors
- See what blog posts and pages are receiving the most visits
But it can get very complicated, very quickly. This is why we’re going to ignore the majority of what’s in Google Analytics for now. All you need to do is create a Google Analytics account and install it on your blog. And while there are plenty of good reasons to install Google Analytics, there are two big ones we’d point to First, Google Analytics stores your data over time. When you’re ready to dive in later, you’ll be thankful that you’ve been collecting data since the beginning. Second, it gives you an overview of your total traffic.
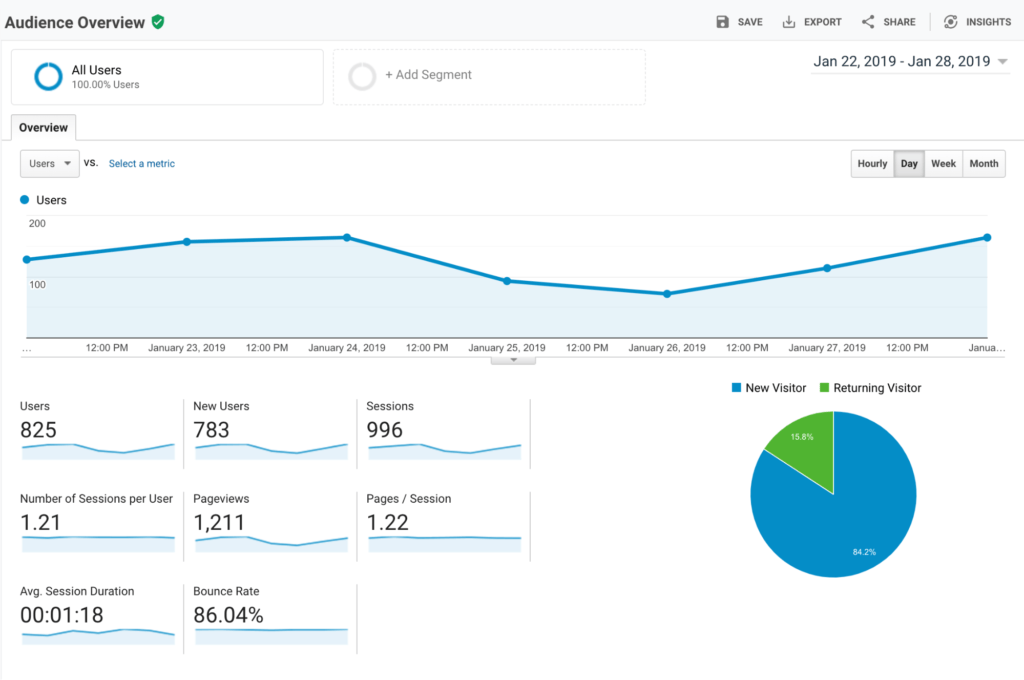
Seeing those first visitors come in will give you a huge motivation boost. Even if you only check Google Analytics to see your total traffic, it’s well worth the time it takes to set up.
It’s also pretty easy to set up. Here’s a step-by-step guide to help:
1. Log into Google Analytics
This is simple. Go to Google Analytics and click on Start Measuring.
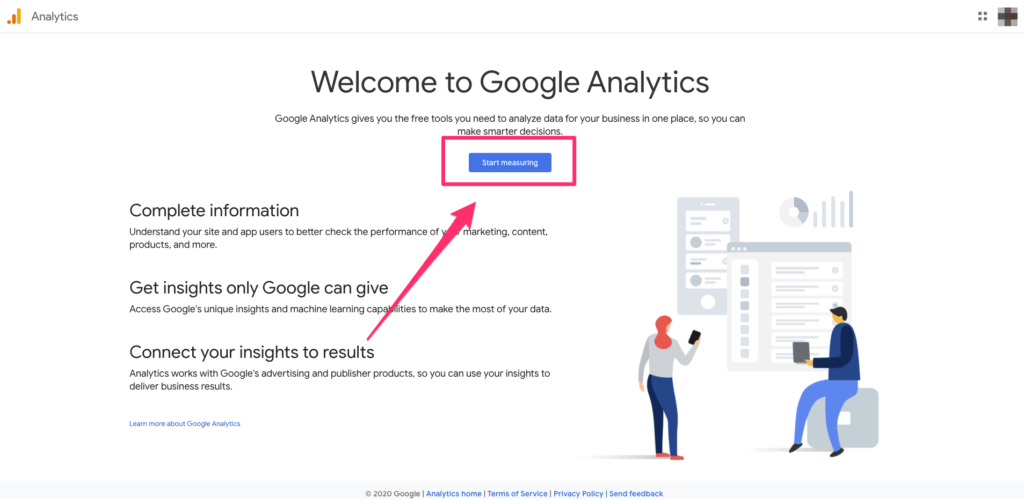
If you’re not logged into a Google account, it’ll ask you to log in to your Google account.
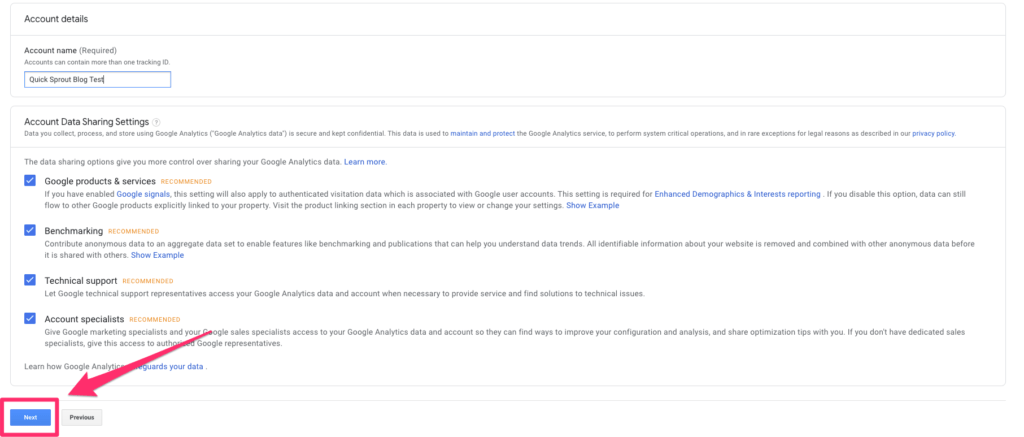
2. Create your Google Analytics account
On this screen, it’ll ask you to provide an account name. Use the name of your website or blog for this. Don’t worry about the boxes with the checkmarks for now. You can always change them later. Once you do that, click on Next at the bottom.
3. Choose what you want to measure
This screen asks you to choose whether you want to measure a website, an app, or a combination of both. Choose Web since you’re creating a blog.
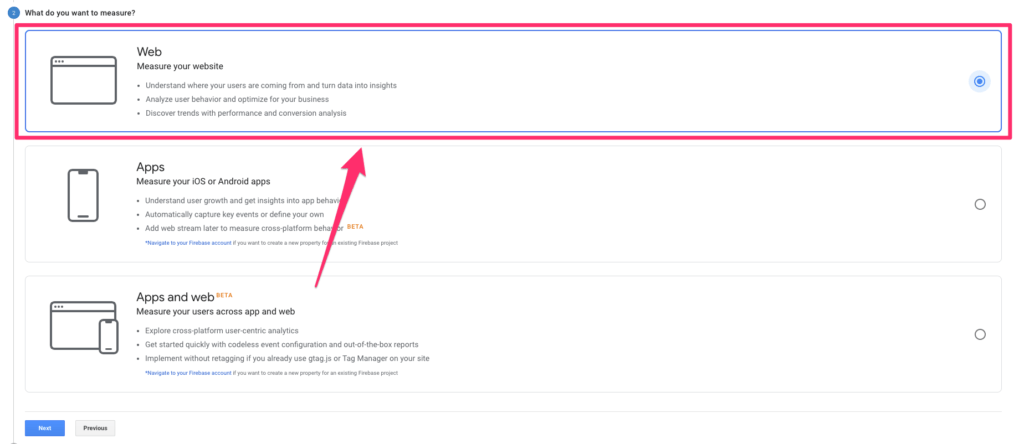
Then click Next.
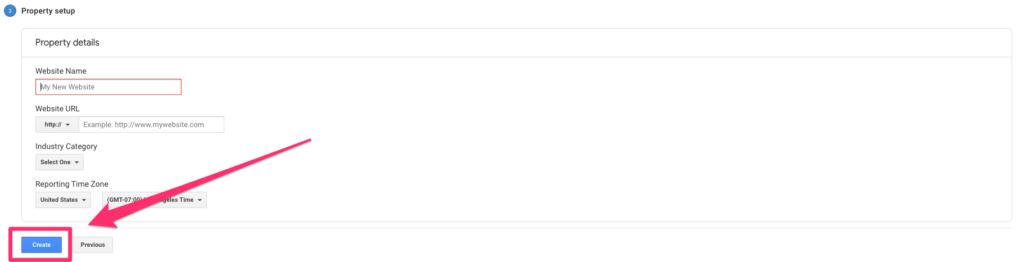
4. Fill in the property details
It’ll now ask you to fill in some details about your website including its name, the URL, your industry category, and your timezone. Once you’ve done that, click on Create at the bottom.
5. Copy and paste the tracking code onto your site
Once your account is created, you’ll have a unique JavaScript tracking code for your site. When you copy and paste that snippet of code into your site, Google Analytics will start collecting data for you.
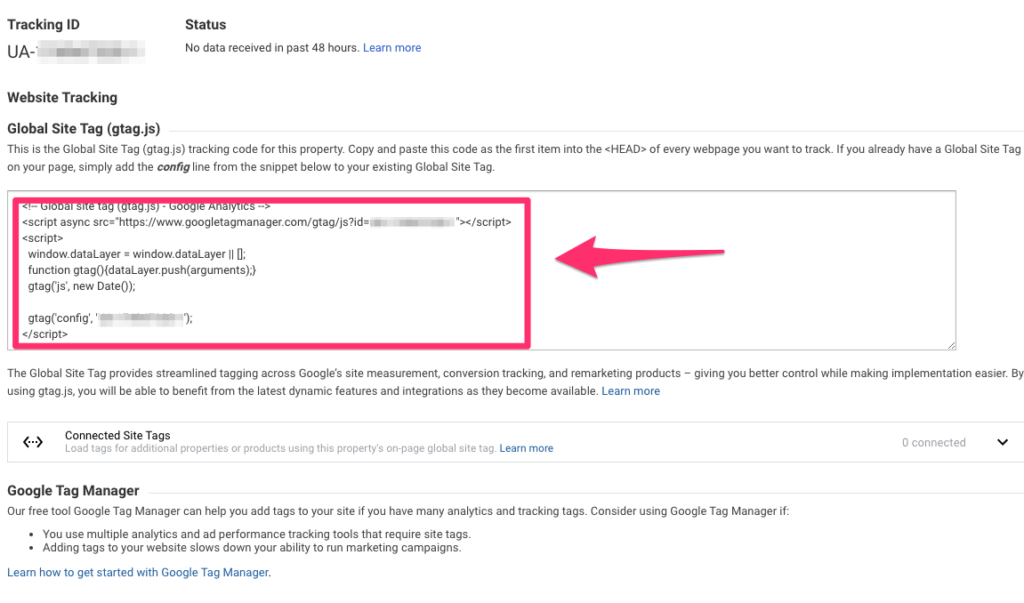
And that’s it. You are now tracking Google Analytics for your blog.
Step 8: Set up your email list
Every marketer or blogger relies on emails at its core. And there’s a good reason for that: Email lists are the best marketing tool. Think of your email list as a giant laser ray you can focus on any offer you want. Publishing a new blog post? Pitch your list at the bottom of the blog post. Of all the marketing channels that have come and gone over the years, only quality content compares to the power of a high-quality email list.
Even if you’re not sure what to send your email subscribers, that’s okay. The important thing is you start gathering a list of subscribers and build the foundation early.
Action step: Create an email list.
Using Constant Contact or other email marketing services, start collecting emails on your blog so that the list is ready for you as soon as you need. It takes time to build a decent size list so your future self will be extremely grateful if you set it up now. Even a super basic opt-in in your blog sidebar is enough to get you started.
Don’t worry about sending any emails yet unless you want to. The main thing is that you’re collecting email subscribers from the beginning. Email lists can be a gold mine once you have a few thousand subscribers, and the money really rolls in once you hit 10,000 subscribers and above.
Step 9: Brainstorm blog topics
On the technical side, your blog is all set up and ready to go. When it comes to topic generation, the world is your oyster. The majority of your blog posts will come from personal experiences, passions, successes, failures, and new learnings.
Step 10: Make an editorial schedule.
One of the most common mistakes amateur bloggers make is writing only when they “feel like it.” They overlook that new fans expect more content, and if they fail to deliver, they lose track.
We strictly adhere to an editorial calendar. Mashable and Hubspot aren’t the only big blogs with schedules. They’re designed for everyday people like you and me.
Action step:
- Create a new Excel spreadsheet. If you have multiple writers, you can use Google Drive to share the sheet. Begin with four columns: the date of publication, the title, the keyword, and the notes.
- Feel free to add more columns like “Author” “Category.” It will be easier to digest and follow if you keep it simple.
- Examine your calendar on your iPhone, Android, or the one on your refrigerator. What is the maximum number of times you can post? Monthly? Weekly? Daily? Consistently missing deadlines can lead to quitting altogether, so be conservative with your goals.
- Then, in the “Title” column, list all of the answers you came up with during your brainstorming session. You don’t have to be perfect with your titles just yet. Include a draft headline that you can polish before publishing. The best headlines sometimes appear after you’ve finished writing your article. You’ll be able to see what your story is about and who it’s for.
- The “Keyword” column is for SEO purposes only. Add specific keyword phrases that you’d like to rank for if you’re targeting them. You can do some keyword research later if nothing comes to mind.
- Last but not least, there’s the “Notes” column. This section is ideal for jotting down brilliant ideas that occur to you. Notes can also help you stay focused on the topic at hand and tackle it logically.
You should be able to come up with a list of 25 blog post ideas with deadlines you can stick to. For a weekly blogger, that’s nearly half a year’s worth of blog posts. Okay. You have the editorial, but the calendar is still missing.
Step 10: Pick a blogging frequency
Writing blog posts isn’t a sprint, it’s a marathon. The best bloggers settle into a consistent writing pace they can maintain for a few years.
Here are a few posting frequency rules of thumb:
- At the bare minimum, find a way to post once per week. This needs to be a substantial post, too: 2,000 words at least.
- Serious bloggers will post 2-3 times per week.
- Larger sites quickly get to 5-7 posts per week. This requires multiple authors.
Look at this chart of blog posting frequency from Orbit Media’s survey of more than 1,000 bloggers. What do you notice?
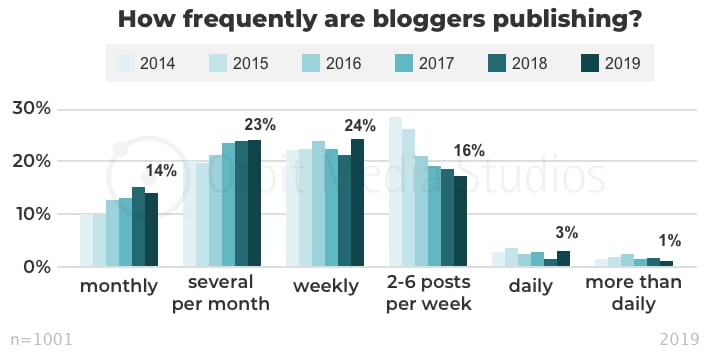
A few takeaways: 14% of bloggers post monthly. But monthly isn’t really consistent enough for you or your readers. If you post weekly, you’re already posting more regularly than 37% of other blogs — this gives you a huge advantage.
ACTION STEP: Start posting at least once a week.
Speaking from experience, great writing isn’t easy. But as experienced professionals, we can keep up. This is why we recommend you start at one post per week.
That still gives you the majority of the week to focus on other aspects of your website while also giving you a break from writing blog posts all the time. A really great post should take you three days to complete. The first and second days are for research and outlining, along with as much writing as you can complete. The third day is for finishing the writing, proofreading, and publishing the post in WordPress.
Also, push quality as hard as you can. The key to building a blog and traffic over time is to write posts that are more valuable than what other people have already published in your category.
Think SEO-wise!
Step 11: Build an audience
Having 1,000 true fans means you can fully support yourself. You can quit your job, work from wherever you like, and be in complete control of your life. With blogging, you’ll build your audience slowly and consistently. As long as you keep at it, you will get there.
ACTION STEP: Use this system to get fans.
Here’s what to focus on in order to get there faster:
- On every post, push on quality as hard as you can. Google the topic and see what other people have done, then ask yourself how you can write something even better.
- Write stuff that hasn’t been written many times already. Find a new point of view or perspective on your topics that other people haven’t already covered.
- Find your voice and be authentic so people can get to know you. This builds connections with your audience faster. A quick hack for this is to pretend that you’re writing your posts to a close friend.
- Allow your readers to comment. Disqus has a ton of users and allows readers to leave feedback, praise your post, or leave criticism for it. If you’re up to engaging your first core readers, leverage this to make a solid connection with them.
- To push even harder, get active in other online communities. Post in Facebook groups, subreddits, on Twitter, do podcast interviews, get speaking engagements when you can – anything and everything. Be as helpful as you can be in these communities.
- For all of your content, constantly ask yourself, “How can I make this as valuable as possible?
Step 12: Monetize your blog
The last step to starting a successful blog is by monetizing its content. As always, there are many ways to go about monetization including:
- Affiliate marketing
- Monetizing your blog with display ads
- Selling private ads
- Selling digital products
- Offering freelance services
- Receiving donations and Tips from readers
- Selling memberships to exclusive content
We discussed the most important ways of monetizing your blog in this article: How To Make Money Blogging: Free Beginners Guide.
How to start a blog: FAQ
How do I start a blog?
Set up a content management system (CMS) (such as WordPress), pick a design, write and publish your first post, and stick to a regular posting schedule.
What CMS are available for blogs?
WordPress, Tilda, Squarespace, and Wix.
What factors should I consider when naming my blog?
To make sure no one else has the same name as you, use free name generator tools like Namelix, check for available domains, check business records, and look on social media.
How do I make my blog search engine friendly (SEO)?
If you’re using WordPress, install Yoast’s SEO plugin, then set up Google Search Console and Bing Webmaster Tools, check your XML sitemap (Yoast can do this for you), and create permalinks.
How do I come up with ideas for blog posts?
Consider this: What excites my readers?
- What are the most common issues that my readers face?
- What character traits do my readers have?
- What do my niche readers adore?
- What is it about my niche that readers hate?
How do I make money from my blog?
Affiliate sales, ad revenue, product sales, and courses are all ways to make money.
Conclusion
It’s simple to start a blog. Hard work, dedication, and grit are required to create one that will be successful and profitable. The benefits, however, far outweigh the risks. Today, blogs are more affordable and accessible than they have ever been.
Of course, obstacles will try to throw you off course, just as they will in any other aspect of life. However, we encourage you to pursue your passion and share it on your blog.
Remember that you’re speaking to humans as you begin your blogging journey. Be yourself. Take a chance. Always be truthful and open. Then, your readers will trust you and welcome ads as well as they consume your regular content.